Tuesday, February 28, 2012

Lemony Chicken and Gravy Sandwich

I had roast chicken leftovers from last week.  I hate wasting anything.  I even saved the pan juices from the chicken since I didn't make gravy.  I got home from work the other night, tired & not too hungry.  Lovey was eating leftovers so I decided to make me a sandwich.

I grabbed the chicken and some leftover rosemary olive oil bread then started looking in the vegetable bin for things to add.  I found half an avocado that was, miraculously, still green and one piece of provolone.

I also eyed the little jar filled with the yummy pan juices from the chicken.  What made it even sweeter was any fat had solidified so I scraped it off and was left with a very nice broth.  I roasted the chicken with several Moroccan preserved lemons so the drippings boasted a heady lemony flavor.

I decided I would make the sandwich an open - faced one just so I could use this broth.

I cut a slice of the rosemary bread in half & toasted it.  Layered a generous amount of chicken thigh meat and avocado slices on each half and topped them off with the provolone.


Using a little bit of corn starch and the broth I made a gravy that was just thick enough to lazily run down the sides of the sandwich.  The heat of the gravy softened the cheese to perfection.

These were so delicious and light yet filling.  I could have stopped with one half; but I didn't; so I felt like a stuffed pup.  A little like this

Friday, February 24, 2012

Zucchini alla griglia

Wednesday evening I slathered a roasting chicken with Moroccan preserved lemons and threw it in the oven for dinner.  Roasting a chicken is such a great, easy dinner.  Once it's in the oven you're free to do other things.  My "thing" that day was to work in the garden.  I took a day of vacation since the weather was to be so beautiful.

Another great thing about roasting a chicken is it never has to be the same.  Whatever I have in the refrigerator at the time gets thrown into the pot with it.  But, this is not about the chicken.  It's about what I made to accompany the chicken for dinner.

It is Lighten Up week at I Heart Cooking Clubs this week.  I selected a grilled zucchini recipe from Tessa Kiros' Twelve cookbook.  It was easy, light and paired great with the lemony chicken.


Zucchini alla griglia - Grilled Zucchini
Adapted from Tessa Kiros' Twelve-A Tuscan Cookbook

Ingredients:
3 medium-large zucchini (courgettes)
1/2 cup extra virgin olive oil
2 garlic cloves
about 6 basil leaves

Mise en place:
  • wash and dry zucchini
  • measure out olive oil
  • peel garlic cloves and lightly crush with the flat of a knife blade
  • roughly tear up basil leaves
Method:
Divide the zucchini into half horizontally, then cut into vertical slices about 1/8-inch thick.  Put them onto the grill about 8 inches away from the coals and grill for a couple of minutes on each side until they are cooked through and grill marks appear.  Transfer them to a bowl.  Add the olive oil, garlic, basil leaves and season with salt and pepper if necessary.

Tessa says this recipe may be eaten immediately, or left to marinate for a few hours.

I'm sharing this post at IHCC

French Apple Tart

The Sunday Food Section of a 1987 edition of the Dallas Morning News published a recipe for French Apple Tart.  The recipe was provided by Univanille International which was a vanilla growers’ cartel in Paris.  I’m not sure this group is still active.
There are several components to this tart; the crust, a filling, the apples and a glaze.

The crust was the most intriguing.  It is truly like no other that I’ve made.

Never have I used ¼ cup of cinnamon in anything.

Also, it is called a Vanilla Crust but believe me, it’s a cinnamon crust. 

Just look at how dark the dough is!  The cinnamon is such a prominent flavor, you can’t detect the dibby dabby  amount of vanilla at all.

The crust mixed up easily and rolled out between two sheets of wax paper lessened the stickiness issue.

Roll your pin over the top of the tart pan to trim extra crust.

Preparing the applesauce filling was a little strange.  You start out with 17-1/2 ounces of unsweetened applesauce and cook it down to only 16 ounces (2 cups).  With such a small reduction the applesauce neither thickened up nor developed any depth in flavor as you would expect when you reduce something, so I’m not sure why this step was necessary.

The preparation of the apples and the glaze were simple enough.

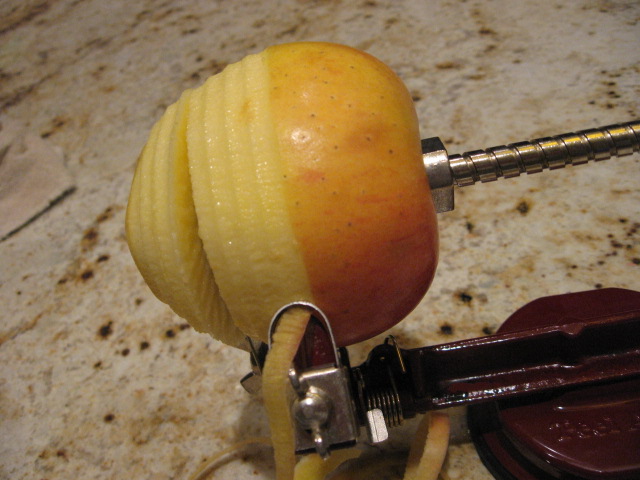
Peeling, coring and slicing apples has been a breeze with this brilliant little apparatus.

I purchased it from L.L. Bean over 15 years ago when Lovey began requesting an apple pie twice a week.  Through the years it has become a dear companion.

Assembly was also elemental.

The applesauce/apricot mixture is poured into the semi-baked pie crust.

Then the apple slices are placed on top of the filling in concentric circles.

The tart baked up nicely and the glaze was carefully brushed onto the baked apples.

I let it cool overnight before trying a piece.  The tart produced a lot of liquid (applesauce perhaps??) that seeped away from the tart, onto the pie plate.  In taste testing, it was not too sweet.  The crust was definitely cinnamon-y; almost had some heat to it, like fresh ginger does.  But, I must say it is not a bad crust.  The tart as a whole was a little bland but could have potential with a couple of changes. Lastly, I think a scoop of a good quality vanilla ice cream on top would make it oh so much better.


French Apple Tart
Serves 8

For the Crust
Ingredients:
1-1/4 cups flour
1/4 cup granulated sugar
1/4 cup cinnamon
1/3 cup cold butter
2 Tbsp. cold water
1 egg yolk
1 tsp. vanilla extract

Mise en place:
  • cut butter into cubes and keep in refrigerator
  • measure out water and keep in refrigerator
  • measure flour, sugar & cinnamon into a food processor  bowl (be sure to fit the metal wing blade in the bowl before putting ingredients in)
  • separate egg
  • measure out vanilla
  • spread a sheet of plastic wrap onto counter top
Method:
Process the dry ingredients with a couple of pulses to blend together.  Add the cold butter cubes and process until mixture resembles coarse meal.

Through the feed tube, add 2 Tbsp. cold water, the egg yolk and 1 tsp vanilla extract.  Process just until the mixture leaves sides of bowl and forms a ball.

On plastic wrap, flatten to a 5-inch round.  Wrap and chill at least 1 hour or up to 2 days.

When you are ready to roll out your dough, work quickly and roll on a lightly floured board or between sheets of wax paper into a 12-inch round.  Ease into a 9-inch tart pan.  Trim by rolling your rolling pin gently over the top of the tart pan edges.  Chill until firm.  Bake in a preheated 425°F oven for 5 minutes.  Chill before filling.

For the Filling & Apples
Ingredients:
1 (171/2 ounce) jar unsweetened applesauce
1/4 cup apricot preserves
3 Tbsp butter (divided)
2 tsp vanilla extract
12 ounces tart apples
2 tsp fresh lemon juice

Mise en place:
  • Measure out applesauce, preserves, & vanilla and set aside
  • divide butter into 1 Tbsp and 2 Tbsp portions; place the 2 Tbsp in small microwave bowl for melting
  • squeeze fresh lemon juice
  • peel, core and slice apples 1/4 inch thick & toss in a bowl with the lemon juice (you should have about 2-1/2 cups apples)
Method:
In a medium saucepan, cook applesauce over medium-low heat, stirring frequently, until reduced to 2 cups, about 10 minutes (I would reduce to 1 to 1-1/2 cups).  Remove from heat and add apricot preserves and 1 Tbsp of the butter.  Cool, stirring occasionally.  Add vanilla extract.  Pour into chilled crust.

Preheat oven to 375°F.  Arrange apple slices in concentric circles over applesauce.  Melt remaining 2 Tbsp butter; drizzle over apples.

Bake until apples are tender and lightly browned, 40 to 45 minutes.

Apricot Glaze - Just before tart is done, prepare the glaze
Ingredients:
1/4 cup apricot preserves
1 Tbsp water
1/2 tsp vanilla extract

Method:
Force the preserves through a sieve.  In a small saucepan or skillet, bring preserves and the water to a boil; cool slightly, Stir in the vanilla.

When Tart comes out of oven, carefully brush the glaze over the hot apples.  Cool tart on a wire rack.  Serve warm or cool.  Add a scoop of vanilla ice cream if you wish.

Monday, February 20, 2012

Pesche al vino bianco

Pink was the theme this week at I Heart Cooking Clubs.  Out of the two Tessa Kiros books I own, I struggled with what to make that was pink. 

I settled on Peaches in white wine from Tessa's Twelve cookbook, with the hopes that the white wine would take on a pinkish color from the peaches.  Didn't happen.


Failing didn't get me down once I tasted this, in Tessa's words, "...very simple, refreshing dessert..".  I will be bringing this one back in the hot days of summer.

 All you do with this recipe is place peeled peaches (or nectarines) in a bowl with castor sugar and let macerate in the refrigerator.


After about an hour, pour in your white wine and put back in the refrigerator to chill.

Pesche al vino bianco - Peaches in White Wine

Ingredients:
8 medium sized, ripe, firm peaches, peeled
10-1/2 ounces castor (superfine) sugar
2 cups chilled white wine (I used a Pinot Grigio)

Mise en Place:
  • Peel peaches and slice
  • measure out sugar and wine
Method:
If you can halve the peaches and remove the stone without squashing the peaches before slicing them, then do so (best to use freestone peaches for this).  If the peaches are a little soft, cut thick slices toward the stone, then cut those slices away from the stone.  Put the slices into a bowl and sprinkle with the sugar.  Cover and leave in the fridge to macerate for at least an hour or so.

Add the wine, gently toss the peaches and return to the fridge for another 15 minutes before eating the peaches and drinking the remaining wine.

I'm sharing this over at IHCC

Saturday, February 18, 2012

Cookies on a Stick

I love making and decorating sugar cookies.  This time of year becomes especially busy due to an annual event at work.  We have a great volunteer group and our primary source of funds each year is a company-wide Valentine Bake Sale.


In addition to all of the donated baked goods brought by employees, a large amount of funds are raised through selling these Valentine cookie bouquets

and Valentine cookies on a stick.


These lovely ladies are 'the two Sharons'.  They have, for the past gazillion years, been the organizers, recruiters, teachers and inspiration-givers of all things relating to these valentine cookies.


There are many volunteers who give their time to this project and without them we wouldn't have all of these to sell.


A group of bakers (myself included) volunteer to make several batches of the sugar cookies on a stick.  I make what we call the smaller short stick cookies and they are sold individually.


The larger ones make up the bouquets.  We fondly call these the fancy ones.
I thought I'd share with you how we make them.  Each of the bakers march home with packets that include our instructions with the recipe for the official dough recipe, a heart cookie cutter, dowels, and parchment paper. 

I'm sure each baker has her own routine on how she accomplishes her task of baking her batches of cookies.  My own routine has changed over the years, depending on the space I've had in my kitchen.  Here's what works best for me.

After a batch of the dough is mixed up it's shaped into an 8" square, wrapped in plastic wrap and put in the refrigerator to chill; I usually make the dough up the night before I'm going to bake.  When I'm ready to cut out cookies I take a dough scraper and cut the batch into squares.  The dough is pretty rock hard at this point so it doesn't hurt it to sit out while I work with individual pieces of dough.  If it gets too soft to work with just stick it back in the refrigerator.


 Break off a piece of dough and work it into a 3 ounce ball and place it on a piece of parchment.  I pre-cut my squares of parchment, sizing according to the cutter.  See the dowels on either side of the dough?  These serve as a guide for your rolling pin to insure that the piece of dough is rolled out to a specific thickness.  The dowels for the short stick cookies are 1/4".


Place larger piece of parchment paper over the dough ball and press slightly with the palm of your hand.


Using your rolling pin continue rolling the dough into a circle until it reaches the desired thickness (making sure the rolling pin rolls across the dowels).


The circle of dough rolled to 1/4" thickness


After cutting the cookie, keep it on it's little parchment piece and place on a cookie sheet that is kept in the refrigerator while you continue cutting out the rest of the cookies.


I stack them, repeating the cutting out process until I've used all my dough.


Working with one cookie at a time, insert your sticks.  Place your hand on top of the cookie.  Gently twist (not push) in the stick until it is about 3/4 of the way into the cookie.  Your hand on the cookie serves as a guide to insure the stick doesn't break through the dough on the top of the cookie and yet not exposed on the bottom of the cookie.


Place the cookies, still on the parchment square, and bake.


When the cookies come out of the oven, take a flat, metal spatula and gently press down on the cookies.  This will make a smoother surface for decorating.


Carefully remove the cookies to cooling racks.  Handle the cookies by the cookie and not  the stick.

All of the volunteer bakers brought their baked cookies up to the office for Glazing Day.


It takes several days to put a bottom glaze on all the cookies.


But with this group of ladies glazing away during their lunch hour the job got done!


The glazed cookies are left to dry.  This year all of the glazing was done on a Thursday and a Friday.  (those 'blue' cookies are actually a beautiful deep purple)

Saturday was a decorating frenzy.  A group of the volunteers met up at the office and spent the day letting our creative juices flow!  There is so much creativity in the room, it is just amazing!  

Let me just put a side note in here that the two Sharons make all of the glazes and royal icing for decorating.  And, believe me, it's a L.O.T. of icing!!


 This is Mandy.  She was one of the decorators who weren't afraid to try new and creative designs. Judging from her t-shirt, she is highly intelligent. Go Pokes!


This is one she decorated.  Don't you love the lacy work?

Here are a couple more that I liked.


 In total we baked, glazed, decorated and packaged 305 cookies on the short sticks, cookies for 54 bouquets, with 3 cookies per bouquet and one raffle bouquet that had 5 cookies in it.  That's a total of almost 472 cookies!!  Woo Hoo!!!  Great job everyone!  Everyone ready for next year?

Cookies-On-A-Stick Dough
Makes approximately 20 to 21 4" cookies

Ingredients:
1/2 pound butter (2 sticks) - salted preferred
1-1/2 cups granulated sugar
2 large eggs
1 Tbsp vanilla
3-1/2 cups all purpose flour
1/2 tsp salt

Method:
Cream butter and sugar together until light and fluffy; around 10-12 minutes.  Add vanilla.  Add eggs one at a time and mix well.  Stir in flour and salt.  Mix until flour is incorporated.  Shape into an 8" square, wrap in plastic wrap and chill dough.

With a pastry cutter or knife, score the dough into about 20 squares.  Roll each square into a ball (you want a ball that weighs around 3 ounces.

Roll out cookies 1/4" thick on parchment paper.  Chill the cut out cookies to firm them up a bit before inserting the sticks.  Gently twist in stick until it is about 3/4 of the way into the cookie.  Chill prior to baking.

Bake at 350°F. for 10 - 12 minutes