Tuesday, December 27, 2016

Turkey Stock


Good stocks are always welcome items in my freezer.  They couldn't be easier to make. They may take time, but there is always a good day to mark on your calendar to spend comfort time in the kitchen. Turkey stock is the champion during the holiday season.  It can be used for gravies and soup bases.

Stock can be made way ahead of the holiday. In the Fall, as soon as I see packages of turkey necks, wings, legs, gizzards, etc. show up in the meat department of my favorite grocery store, I get to work.


This year I used turkey necks, wings and legs.  Everything gets rubbed in oil, salted and peppered.


These get roasted in a 400° oven for about 45 minutes.


 While the turkey parts are roasting, prepare the vegetables. I used carrots, onion, garlic, celery, and fresh sage leaves.


Once the meats are roasted, remove them, temporarily, and place the vegetables in the bottom of the roasting pan.  Give the vegetables a toss to coat with the drippings in the pan.


Return the meats to the pan placing them on top of the vegetables, turning the meats over with the roasted side down.


This gets returned to the oven to roast for 35 minutes longer.


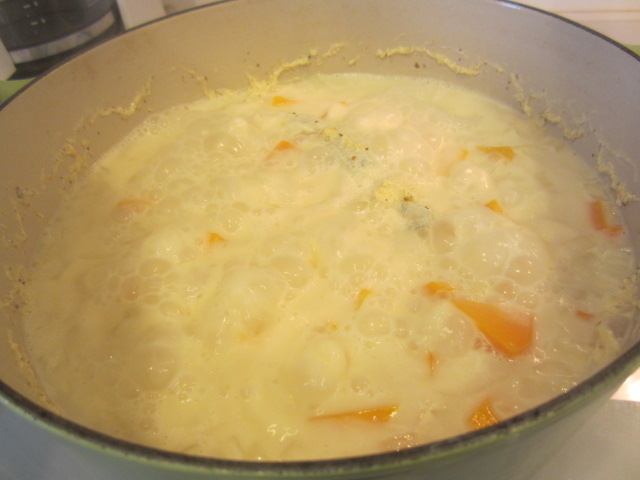
Once the turkey parts and vegetables are removed from the oven they are placed in a large stock pot, covered with water and simmered for 2 hours.


Everything is strained and the stock is cooled in the refrigerator so any fat can be skimmed off.


The stock is now ready for freezing.  Pour into four 1-quart Mason jars or four 1-quart plastic freezer bags.  If you freeze in Mason jars, be sure to leave space at the top for the stock to expand and put the lid on loosely until the stock is frozen solid.  If you elect to freeze in freezer baggies lay them flat on a sided baking sheet until the stock is frozen solid.  Also,  I would highly suggest NOT using the bags with the slider zippers.  They can leak while the baggy is lying flat on a baking sheet.  Once frozen solid, the baggies will stack well in the freezer.
 

Turkey Stock
Adapted from a recipe of Guy Fieri's
Yields 4 quarts of stock


Ingredients:
2 turkey legs
2 turkey wings
2 turkey necks
2 Tbsp. canola oil
salt and freshly ground black pepper
6 large garlic cloves
2 large yellow onions, quartered
2 large carrots scrubbed
3 stalks of celery, chopped in half
6 fresh sage leaves
6 quarts water

Method:
Preheat oven to 400°F.

Evenly rub turkey parts with oil.  Sprinkle with salt and pepper.  Place turkey parts in a large roasting pan, skin side down, in oven and roast for 45 minutes.

Prepare and combine vegetables and sage leaves.  Reduce heat of oven to 350°F., briefly remove turkey from roasting pan. Add vegetables to roasting pan, tossing to coat in pan juices.  Return turkey parts placing skin side up on top of vegetables and continue to roast for another 35 minutes.

Remove pan from oven and transfer turkey parts and vegetables to a 10 quart or larger stock pot. Place the roasting pan over burners of range top (do this only if your roasting pan is a heavy-duty pan), add 2 cups of water to the pan and boil, scraping up any stuck bits.  Pour this into the stock pot.

Add 6 quarts of water to the stock pot.  Bring to a boil then lower heat and keep to a medium to low simmer for 2 hours, uncovered until stock is deep in color and flavor.  Strain turkey and vegetables from stock, pushing any vegetable matter through strainer.  Let stock sit, overnight in refrigerator if time allows, then skim off any fat from top.

Divide stock into 4 Mason jars or plastic freezer bags and place in freezer.


Monday, December 26, 2016

Holiday Cornbread Dressing


I refer to this as Holiday dressing because that is pretty much the only time I make it; Thanksgiving and Christmas.  Most of us create some derivative of recipes we grew up with and that is the category this recipe falls into.

I loved my mom and dad's dressings growing up. Mom would make our traditional cornbread based dressing and dad would like to change it up by adding oysters to his batch. I liked both.

Once I left home for college then living on my own, I didn't make or have dressing unless I went home. Years later at my sister's house she was making a big batch of Mom's dressing and I paid close attention. I've been making mine ever since.  As with so many recipes it's easy to make them your own. This is pretty much the way we had it growing up, except for the "other" bread used in conjunction with the cornbread.

The cornbread....I don't make the cornbread from scratch the way I do for, say, ham hock and beans. I whip up a couple packages of Martha White's Yellow Cornbread Mix. There are others on the market such as Corn-Kits & Pioneer but one that I will not use for dressing is Jiffy. It's much too sweet for my taste.

Using a packaged mix makes things a little simpler; especially when there are so many other things going on in the kitchen during Thanksgiving and Christmas day.

I bake mine in an 8 x 8 Pyrex pan.   Once the corn bread is baked and cooled in the pan crumble it up. Two packages make about 8 cups crumbled cornbread. Whatever other bread you use for your dressing, you want to keep it at a ratio of 2 parts cornbread to 1 part other.


So, for the other bread choices to add to the dressing....I have used plain white sandwich bread (my favorite) such as Rainbow or, here in Texas, Mrs. Baird's. I have also had great luck with baking up a batch of canned biscuits. Enter Lovey into my life and he prefers a 'healthier' choice like La Madeleine Country Wheat. Ssshhh, I'm not telling
 him that this will not make his dressing 'healthy'. But, I aim to please my man so I now use the country wheat. In this recipe I'll use about 4 cups bread. Tear it up by hand or cube using a knife.

Once the breads are combined I sauté onion and celery in a couple sticks of butter.  Yes, I said a couple of sticks.  Butter makes everything better and tastier.  Add the vegetables to the mix and use chicken stock to moisten. How moist you like your dressing can be determined by the amount of stock you add. You can add extra melted butter too. There's not a strict rule; it's what you like.

Prior to adding the egg to bind the mixture I season to taste with salt, pepper, and rubbed sage lastI don't usually have to add much salt because the chicken stock is normally salty enough.  Add sage a Tbsp. at a time.  I like a lot of sage but if you use too much it can leave a bitter after taste.
  Get in there with your hands and mix it all up.


If you are serving dinner at a nicely set table, you can bake this in a nice oven proof, serve-at-the-table baking dish.  I made this in a disposable this year because it's just Lovey and myself.

Now, if you want to use part of this recipe as stuffing and cook it inside the bird, please just make sure that, 1) don't cram it in the cavity of the bird; pack it loosely as it will expand; and 2) take the temp of the dressing and make sure it registers at 165°F. 


 Bake for about 30 minutes until hot throughout.

This recipe will serve about 12 if the servings are approximate to the photo above.  In our house this recipe would serve about 6 😋.

Ingredients:
2 - 6 ounce packages yellow cornbread baked according to package instructions
4 cups cubed bread or biscuits

2 sticks salted butter
6 stalks celery, chopped
1 large onion, chopped
4 cups chicken broth, boxed or homemade
salt and pepper to taste
5 Tbsp. rubbed sage
3 large eggs, slightly beaten

Method:
Preheat oven to 350°F.

Prepare cornbread according to package instructions.  Cool and crumble in a large mixing bowl.  Cube or tear up bread and add to mixing bowl.

Melt butter and saute' celery and onion until beginning to soften.  Add to bread mixture and toss well.  Add chicken broth and mix.  Season with salt and pepper.  Add sage.  Once you are satisfied with the seasoning, add the eggs.

Turn mixture into a 9 x 13 baking dish.  Bake for 30 - to 40 minutes or until top is golden brown. 

Tuesday, November 1, 2016

Cream of Butternut Squash Soup with Sea Scallops and Shrimp

Come Autumn, butternut squash is used a lot in our house.  Soup is a staple.  I've tasted many delicious butternut squash soups that are more on the sweet side, using apples, cinnamon and nutmeg. This one is a more savory recipe garnished with scallops and shrimp.


It's really easy; the majority of the labor is in chopping all the vegetables.


The squash, onion and garlic are all thrown into a Dutch oven.  I've also added a bouquet garni of thyme, rosemary, parsley, sage, and bay leaf. For this soup I wrapped the herbs in cheese cloth because I didn't want flecks of the herbs in the soup. 


 After the chicken broth and cream are added to the pot it's all brought to a boil. Cover the pot and lit it simmer over reduced heat until the squash is tender.


 Discard the bouquet garni


In batches, puree in a blender or food processor.  With this batch I had to use my immersion blender because my blender broke and I sold my food processor in our estate sale.  It is at this point that you can make this soup as thick or thin as you like.  You can add chicken broth, milk,  or cream.


You can garnish the soup with anything you want; pepitaps, croutons, grated cheese, and on and on.  I opted for sauteéd scallops and shrimp sauteéd in butter.


Ladle into soup bowl, garnish and enjoy.

Butternut Squash Soup
Serves 10 or more

Ingredients:
3 pounds butternut squash
1 large yellow onion
1 large clove garlic
1-1/4 tsp. salt, divided
1/8 tsp. ground pepper
3 sprigs flat leaf parsley
1 fresh sage leaf
1 large sprig rosemary
4 sprigs thyme
 3-4 bay leaves
4 cups chicken broth
1 cup whipping cream
10 sea scallops
2 Tbsp. vegetable oil
10 large shrimp
2 Tbsp. unsalted butter

Method:
Peel, seed and cube the squash and toss in a 5 to 6 quart Dutch Oven.  Chop onion and dice garlic and add to pot.  Add 3/4 tsp of the salt and pepper to the pot. 

In the center of a square piece of cheese cloth  bundle the parsley, sage, rosemary, thyme and bay leaves. Roll the cheese cloth around the herbs and tie at each end and the middle with kitchen twine.  Throw into pot.

Pour the chicken broth and whipping cream into the pot. Stir to mix, cover the pot and bring to a boil over medium-high heat.  Reduce heat and simmer about 20 minutes or until squash is tender. Remove from heat and allow the mixture to cool for 10 minutes.

Peel and de-vein the shrimp and set aside. Pat scallops dry on both sides and set aside.

In batches, pureé the mixture until smooth and return to pot.  Add additional broth or cream if you wish, depending on your desire of thickness of the soup. Keep soup warm.

For the scallops, preheat a 12-inch non-stick skillet over high heat.  Add 2 Tbsp. vegetable oil.  Sprinkle with the remaining 1/2 tsp. salt.  When oil starts to smoke, add scallops to pan.  When scallops brown, turn over and turn off heat. Cook for 1 minute. Remove from skillet  to avoid overcooking.  Wipe out skillet.

Return skillet to medium heat and melt the unsalted butter until foaming subsides and the butter is golden brown   Add shrimp and sauté for 1-1/2 minutes on each side.

Ladle soup into soup bowls and garnish with the scallops and shrimp.

Thursday, October 20, 2016

Southern Smothered Pork Chops / Steak


I love a good pork chop. When I was in Junior High I baked them sitting on a thick slice of onion with a can of Campbell's Tomato Soup poured on top; a recipe I learned from a family I baby sat for.  

After moving back out to west Texas to take care of Papa I began baking them, at his request, smothered with cream of mushroom soup.  I wanted to get away from the canned soup thing so I started looking for recipes that made its gravy from scratch rather than a can.

I didn't have to look far because there was one in the current October/November 2016 issue of Cook's Country.


 Start with great meat. Luckily for me there is a great source for that in Midland.  I bought 4 beautiful pork loin chops, weighing about 8 oz. each, at Midland Meat Company.  They are rubbed with a seasoned salt mixture.


 They get dredged in flour that has been seasoned with some of that same seasoned salt mixture.  Set them aside on a wire rack to rest.


Fry two chops at a time for 3-5 minutes per side.


Put the chops back on the rack while you prepare the gravy.


 Make a roux with 1/4 cup of the pan drippings/oil and flour.  Cook until the roux reaches the color of peanut butter.


Throw the onions into the roux.


Add more of the seasoned salt mixture and cook for several minutes until onions begin to soften


Slowly add 3 cups of water and mix until smooth.  Let simmer until thickened.


Pour half of the gravy into a 13 x 9 baking dish.  Place the chops in the pan then pour the rest of the gravy over the chops.


Cover with foil and bake for 1-1/2 hours in a 350° F. oven.


Carefully transfer the chops to a serving platter. Add some cider vinegar to the gravy and pour the gravy over the chops.  MMmmmmm. Dinner.  Serve 'em up with rice or couscous.

NOTE:  This can also be make with Top Round Steak for Smothered Steak

Southern-Style Smothered Pork Chops
Adapted from Cook's Country October-November 2016 issue
Serves 4

Ingredients:
2 Tbsp. Lawry's Seasoned Salt
1 Tbsp. onion powder
1 tsp. granulated garlic
1 tsp. paprika
1 tsp. pepper
4 (8 to 10 ounce) bone-in pork loin chops, 3/4 to 1 inch thick or 1-1/2 pounds top round steak cut in serving pieces
1 cup all-purpose flour, divided
1/2 cup vegetable oil
1 large yellow onion, quartered through root end and sliced thin crosswise
3 cups water
1 Tbsp. cider vinegar

Method:

Adjust oven rack to the middle position and heat oven to 350°F.  Set wire rack in a rimmed baking sheet.  Combine the seasoned salt, onion powder, granulated garlic, paprika, and 1 tsp. pepper in a small bowl. Divide the seasoned salt mixture into thirds (4 tsp. in each portion).

Pat meat dry with paper towels.  Sprinkle both sides of each chop or steak with one portion of the salt mixture (about 1/2 tsp. per side - will be a little less each side if you have more than 4 pieces of the round steak).

Combine 1/2 cup of the flour and another 4 tsp. portion of the salt mixture in a shallow dish.  Dredge chops lightly in the seasoned flour, shaking off excess, and transfer to the prepared rack.

Heat oil in 12-inch skillet over medium-high heat until just smoking.  Add 2 chops to skillet and fry until deep golden brown, 3 to 5 minutes per side.  Let excess oil drip from chops, then return chops to rack.  Repeat with remaining 2 chops.

Transfer fat left in skillet to a liquid measuring cup.  Return 1/4 cup fat to skillet and stir in remaining 1/2 cup flour.  Cook over medium heat, stirring constantly, until roux is color of peanut butter, 3 to 5 minutes. Add onions and remaining 4 tsp. portion of the salt mixture and cook, stirring constantly, until onions begin to soften slightly, about 2 minutes.

Slowly stir water into roux mixture until gravy is smooth and free of lumps.  Bring to simmer and cook until gravy begins to thicken, about 2 minutes.

Pour half of gravy into a 13 by 9-inch baking dish.  Nestle browned chops in dish, overlapping slightly if necessary.  Pour remaining gravy over chops and cover dish tightly with aluminum foil.  Bake until chops are fully tender, about 1-1/2 hours.

Carefully transfer chops to serving platter (they may be fall-apart tender). Skim fat from surface of gravy.  Add vinegar to gravy and season with pepper to taste.  Pour gravy over chops.


Monday, August 29, 2016

Fried Okra


Summer's here and that means fresh, locally grown okra at the Midland Farmer's Market. We have been eating it literally every Saturday night for the past 5 weeks.

Here's how I like to do it.


 First and most important is your okra.  Select each pod with love and care.  That translates as: buy fresh, if possible; like at a farmer's market where you are pretty sure they've been plucked from the garden that morning.  Select small, tender pods.  If they are too big they are stringy and tough, tough, tough.


Rinse, pat dry and slice the okra.  Allow the cut okra to marinate in buttermilk for about 45 minutes.


Start heating your oil up. You want your oil to be between 350° to 375°.  I like to use my 12 inch Lodge cast iron skillet. The suggested amount of oil should come half way up the side of the pan.


Drain off any excess buttermilk then toss the okra in a flour/cornmeal mixture. 


Place the breaded okra on the parchment paper.  Once the cooking process begins it goes fairly quickly.  That's why we want to get all the okra breaded at once, waiting to be placed in the skillet. Between each batch you may have to allow the oil to return to the suggested heat.


Don't crowd the skillet; you can do this in batches.


With a slotted spoon, transfer the okra to a paper towel-lined serving platter.  Sprinkle with a little Kosher salt.  "Caution Will Robinson!" this is the point you may have to slap hands away from the goods. You, as the cook, are of course allowed to pick/eat as much as you want prior to putting it on the table.  A small perk for the cook.


Fried Okra
Serves 6

 Ingredients:
2 pounds fresh okra
1/2 cup buttermilk
1/2 cup cornmeal
1/2 cup all purpose flour
1 tsp. Kosher salt
1/4 tsp. garlic powder
1/4 tsp. freshly ground pepper
2 cups canola or peanut oil
Kosher salt to taste

 Method:
Lay an 18" piece of parchment paper on the cabinet. This will be for the okra after you dredge the pieces in the cornmeal / flour mixture.  Place paper towels on a serving platter. This is for the okra as it comes out of the oil.

Rinse and pat dry okra.  Cut off the cap and tip.  Slice each pod into 1/2 inch pieces.

Place sliced okra in a bowl and toss with buttermilk.  Refrigerate for 45 minutes prior to frying.

Combine cornmeal, flour, salt, garlic powder and pepper in a mixing bowl.

In a cast iron skillet heat oil to 350° to 375°.   

Drain the buttermilk off the okra pieces.  Toss the okra in the cornmeal / flour mixture and lay out on the parchment paper. I like to allow the breaded okra to sit for a little bit and come to room temperature.  That way the temperature of the oil won't drop drastically.

In batches, drop handfuls of okra into the hot oil.  Fill the pan but don't crowd okra in the pan.  You want one layer. Avoid turning the okra much because a lot of the cornmeal will just fall to the bottom of the pan and will eventually burn. Let them be until you see they are turning a golden brown on bottom and, with a slotted spoon, carefully turn.

When the batch is golden brown use a slotted spoon and remove the okra to the serving dish covered in paper towels.  Lightly sprinkle with Kosher salt

Repeat with the rest of the okra, in however many batches it takes.Toss a little Kosher salt on each batch as you place them on the paper towels.

Serve immediately.

Saturday, August 27, 2016

Cream of Roasted Hatch Chile Soup


Ahhhh, Hatch Chile season.  I love it.


I can buy them in mass quantities, already roasted which is so much easier than  roasting them myself at home.  When you select a package of roasted chiles, make sure they are really roasted.  You want the skins charred black.  They will be much easier to remove the skins.  If they are just partially roasted you'll have to peel off the waxy skin and that's a pain.


Let's talk about heat for a moment.  I definitely remove the seeds because I just don't want the texture.  Even if the Hatch chiles are the "mild" variety, the veins pack some heat.  So, I would suggest if you want your soup really spicy leave all the veins.  If you want a little bit of spice, remove half of the veins.  If you really want the soup milder, remove all the veins.  You will still get that fabulous Hatch Chile flavor.


 After rinsing all of the charred skins off, removing seeds and removing veins, coarsely chop and put into a pan with chicken broth.  You are just heating the broth and chiles up since the chiles are already cooked.


 In batches pureé the broth and chiles until very smooth. 


Since you are blending something hot I would suggest placing a tea towel over the top of the blender lid just in case the contents decide to spew everywhere.


You should have about 8 cups of pureé


 Pour the pureé back into the saucepan and slowly re-heat.  Add the cream then salt to taste.  The seasoning of the final produce will depend on how seasoned the broth you use is. 

Cream of Roasted Hatch Chile Soup
Serves 8

Ingredients:
6 cups chicken broth
2 lbs whole roasted hatch chiles
1 cup Heavy cream

Method:
Purchase two pounds of roasted hatch chiles from the local roaster. Rinse/clean the skin off the chiles. Male a slit down the Chile and move the seeds and two of the three veins in the pepper.

Roughly chop the chiles and add to the chicken broth, just long enough to warm and meld flavors with the chicken stock.  

In batches, pureé the vegetables and broth.  Pour back into the saucepan and slowly re-heat.  Stir in the cream then season to taste.  Serve with croutons or crushed tortilla chips.


Friday, August 26, 2016

Southern Peach Cobbler

 When I selected my peaches at the market, they were perfectly shaped, colored and ripe .  When I leave the market I hand the sacker-boy my bag of hand selected peaches and ask him to pack separately with care which translates "Don't throw them into a bag. I would like to get home with fruit that's not bruised."  What did he do?  He placed them in their own private bag and literally tossed them in the cart. Oh well....


This is a very simple recipe to prepare.   

Peel and slice your peaches.
Place stick of butter in a 9-1/2" x 11" baking dish and place in a preheated  350°F oven.

Mix the batter in a large measuring cup.  Mix together the flour, baking powder, salt, milk, and sugar.  Remove baking pan from oven and pour the batter into the  baking dish.  Yes, you are an observant individual....I did not take a photo of the batter.
 

Gently place the peaches on top of the batter.  Place in the oven for about 30 minutes and this is what will emerge.

 
See how the batter gently folded over the peach slices? Pure deliciousness. Especially with vanilla ice cream 

Peach Cobbler
Adapted from Nathalie Dupree's "New Southern Cooking
Serves 6 - 8

Ingredients:
1/2 cup butter
1 cup all purpose flour, preferably soft-wheat
1-1/2 tsp. baking powder
1/2 tsp. salt
1 cup milk
1 cup sugar
2 cups peaches, peeled and sliced, juices reserved

Method:
Preheat oven to 350° F.

Put the butter in a 9-by-13-inch ovenproof serving dish and place in the oven to melt.  

Mix together the flour, baking powder, and salt in a bowl and stir in the milk and sugar to make a batter.  Remove the hot dish with the melted butter from the oven and pour in the batter.  Spoon the peaches and then the peaches over the batter.  Place the dish back in the oven and bake until the batter is browned and has risen up and around the fruit, about 30 minutes.