Showing posts with label side dish. Show all posts

Tuesday, December 5, 2017

Lemon Spaghetti

This is a wonderfully light and bright dish to make as a side or an entreé.  Most of the time Lovey and I make this as an entreé and serve with a grilled chicken breast or poached fish.

It is so simple and easy to throw together and although it only takes minutes to prepare you can still make the sauce ahead of time, set in the refrigerator for up to 8 hours so all you have to do at dinner time is boil your water for the pasta.


Ingredients are few.  You have spaghetti (naturally), grated fresh Parmesan Reggiano, olive oil, lemon juice, salt and pepper


Simply throw the olive oil, lemon juice, Parmesan, and salt and pepper into a large enough mixing bowl to easily toss a pound of cooked spaghetti.  Set that aside.


When I think of it I'll toss one of the juiced lemon halves and a basil stem into the salted water.  


Drain and pour into mixing bowl that has the sauce.  Sprinkle with the lemon zest.  At this point you may also add chopped basil if you choose to use.  Toss to coat the spaghetti and season to taste, if needed. Add some of the reserved cooking liquid from the spaghetti at this point.


If this is going to be the main dish you can serve as is...
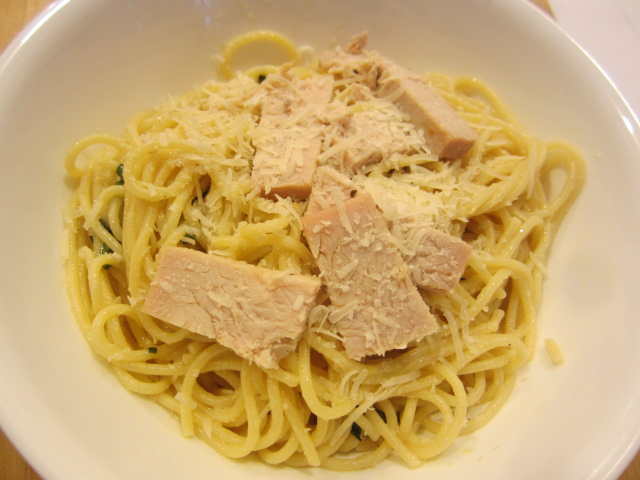


or top the spaghetti with the sliced grilled chicken breast...


or poached cod.


Lemon Spaghetti
Adapted from Everyday Italian by Giada de Laurentiis
Serves 4 as a main dish or 6 as a side dish

Ingredients:
2/3 cup freshly grated Parmesan
2/3 cup extra virgin olive oil
1/2 cup freshly squeezed lemon juice (about 2 lemons)
3/4 tsp. kosher salt, plus more to taste
1/2 tsp. freshly ground black pepper, plus more to taste
1 pound dried spaghetti
1/3 cup chopped fresh basil (optional)
1 Tbsp. grated lemon zest (from about 2 lemons)

Mise en Place:
  • grate Parmesan
  • grate zest from lemons
  • squeeze juice from lemons
  • chop or chiffonade the basil if using

Method:
In a large mixing bowl mix together the Parmesan, olive oil, lemon juice and salt and pepper.  Whisk together and set aside.  NOTE:  If you make this sauce ahead of time mix in a smaller bowl, cover with plastic wrap then store in refrigerator for up to 8 hours.  Bring the sauce to room temperature before using.

Bring a large pot of salted water to a rolling boil.  Add the spaghetti and cook, stirring occasionally, until tender but still firm to the bite, about 8 minutes.

Drain, reserving 1 cup of the cooking liquid. Add the spaghetti to the bowl lemon sauce, toss with the lemon zest (and basil if you are using). Toss the pasta with enough of the reserved cooking liquid, 1/4 cup at a time, to moisten.

Season with additional salt and pepper if desired. Transfer to bowls and serve.

Serving Options: Top with sliced, grilled chicken breast or poached or sauteéd fish such as salmon or cod.

Monday, August 29, 2016

Fried Okra


Summer's here and that means fresh, locally grown okra at the Midland Farmer's Market. We have been eating it literally every Saturday night for the past 5 weeks.

Here's how I like to do it.


 First and most important is your okra.  Select each pod with love and care.  That translates as: buy fresh, if possible; like at a farmer's market where you are pretty sure they've been plucked from the garden that morning.  Select small, tender pods.  If they are too big they are stringy and tough, tough, tough.


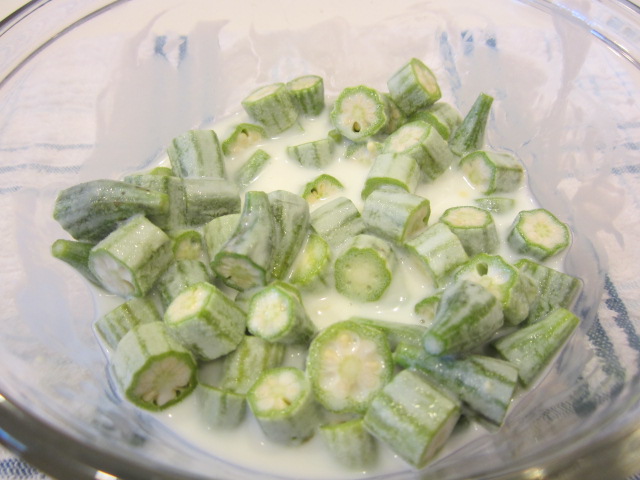
Rinse, pat dry and slice the okra.  Allow the cut okra to marinate in buttermilk for about 45 minutes.


Start heating your oil up. You want your oil to be between 350° to 375°.  I like to use my 12 inch Lodge cast iron skillet. The suggested amount of oil should come half way up the side of the pan.


Drain off any excess buttermilk then toss the okra in a flour/cornmeal mixture. 


Place the breaded okra on the parchment paper.  Once the cooking process begins it goes fairly quickly.  That's why we want to get all the okra breaded at once, waiting to be placed in the skillet. Between each batch you may have to allow the oil to return to the suggested heat.


Don't crowd the skillet; you can do this in batches.


With a slotted spoon, transfer the okra to a paper towel-lined serving platter.  Sprinkle with a little Kosher salt.  "Caution Will Robinson!" this is the point you may have to slap hands away from the goods. You, as the cook, are of course allowed to pick/eat as much as you want prior to putting it on the table.  A small perk for the cook.


Fried Okra
Serves 6

 Ingredients:
2 pounds fresh okra
1/2 cup buttermilk
1/2 cup cornmeal
1/2 cup all purpose flour
1 tsp. Kosher salt
1/4 tsp. garlic powder
1/4 tsp. freshly ground pepper
2 cups canola or peanut oil
Kosher salt to taste

 Method:
Lay an 18" piece of parchment paper on the cabinet. This will be for the okra after you dredge the pieces in the cornmeal / flour mixture.  Place paper towels on a serving platter. This is for the okra as it comes out of the oil.

Rinse and pat dry okra.  Cut off the cap and tip.  Slice each pod into 1/2 inch pieces.

Place sliced okra in a bowl and toss with buttermilk.  Refrigerate for 45 minutes prior to frying.

Combine cornmeal, flour, salt, garlic powder and pepper in a mixing bowl.

In a cast iron skillet heat oil to 350° to 375°.   

Drain the buttermilk off the okra pieces.  Toss the okra in the cornmeal / flour mixture and lay out on the parchment paper. I like to allow the breaded okra to sit for a little bit and come to room temperature.  That way the temperature of the oil won't drop drastically.

In batches, drop handfuls of okra into the hot oil.  Fill the pan but don't crowd okra in the pan.  You want one layer. Avoid turning the okra much because a lot of the cornmeal will just fall to the bottom of the pan and will eventually burn. Let them be until you see they are turning a golden brown on bottom and, with a slotted spoon, carefully turn.

When the batch is golden brown use a slotted spoon and remove the okra to the serving dish covered in paper towels.  Lightly sprinkle with Kosher salt

Repeat with the rest of the okra, in however many batches it takes.Toss a little Kosher salt on each batch as you place them on the paper towels.

Serve immediately.

Saturday, May 28, 2016

Cucumber and Tomato Salad

This will make a lovely and light side dish to many of my meals this Summer.  

It's quick and easy and you could double it if you needed to take a little something to a picnic.

You shouldn't have many leftovers since it makes a relatively small amount. But, if you do it is great the next day to toss with a bowl of lettuce for a nice salad.


Cucumber and Tomato Salad
Adapted from Paula Deen
Yields 4 servings

Ingredients:
 3 Tbsp. white wine vinegar
2 Tbsp. olive oil
1 tsp. sugar
3 cucumbers (about 2 pounds)
1 - 10 ounce container grape tomatoes
1/2 medium white onion
2 Tbsp. fresh dill
kosher salt, to taste
black pepper, freshly ground, to taste

Method:
In a large bowl combine the vinegar, olive oil and sugar.  Whisk together until sugar is dissolved and the mixture is emulsified.

Peel the cucumbers and slice in 1/4" slices.

Halve the tomatoes

Slice the onion paper thin. Place the onion half on the cutting board and make very thin slices, slicing from the side of the onion, not from the root end.

Add the cucumbers, tomatoes and onion to the oil and vinegar mixture and toss.

Chop the dill and toss with the vegetables.  Salt and pepper to taste.

Allow the salad to marinate in the refrigerator for 20 minutes before serving.

Tuesday, December 22, 2015

Classic Southern Squash Casserole


There are many, many squash casseroles out there; and I've probably tried most of them.  There is something about squash casserole that I love.  I don't know if it is the soft, creamy texture or simply the taste of the squash.  Most squash casserole recipes I've made over the years have been very good.  This particular one has found its way to the top of the ladder and is the only squash casserole recipe I use any more.

Paula Deen says that no southern cook is worth her salt without a good squash casserole recipe.  Well, all you southern cooks, this is it!  Put it in your repertoire.  It's creamy and souffle-like.  The ingredients are few and simple and it's truly southern. 

What sets this recipe apart from the others Ive made is that the squash is peeled.  I truly think that makes a difference; especially if you are stuck with thick-skinned squash.

The onion and squash slices will simmer in water until tender.  After you drain the squash you will mash it up with a fork.


In the same pan combine the mashed squash and onions, 1/2 cup of the cheese, the mayonnaise and the crackers.  You can make this recipe gluten free by using gluten free crackers.


Stir in the egg and the butter.  Salt and pepper to taste.

 
Turn into a prepared baking dish, sprinkle with the remaining cheese and bake until the cheese is melted and squash is bubbling.  Mmmmm....it's so creamy and good.

  Classic Southern Squash Casserole
Adapted from Paula Deen's Paula Deen & Friends, Living It Up, Southern Style
Yields 8 to 10 servings

Ingredients:
6 medium yellow summer squash (approximately)
1 small yellow onion
1-1/2 cups grated sharp Cheddar Cheese (about 6 ounces) - divided
1/2 cup Hellmanns Mayonnaise
10 soda crackers (saltines) - To make this a gluten free recipe use gluten free crackers
1 egg
2 Tbsp. salted butter
Salt and pepper, to taste

Mise en place:
  • preheat oven to 350°F..
  • spray an 8-inch square baking dish with vegetable oil cooking spray
  • peel the squash and cut into 1/4-inch slices
  • chop onion
  • grate cheese
  • measure out mayonnaise
  • place crackers in a plastic baggie and crush
  • crack egg and lightly beat
  • melt butter
Method:
Place the squash and onion in about 2 inches of salted water in a medium saucepan.  Bring to a rolling boil, then reduce the heat to medium-low and simmer until the squash is very tender, about 10 to 12 minutes.  Drain the squash.

In the same pot, mash the squash and onion with a fork; you should have about 2 cups of cooked squash.  Add 1/2 cup of the cheese, the mayonnaise, and the crumbled soda crackers.  Stir in the egg and butter.  Taste; add salt and pepper as needed.  Pour into the prepared baking dish.  Top with the remaining 1 cup cheese.  Bake for 25 minutes, or until the cheese is melted and the casserole is bubbly.

Saturday, February 7, 2015

Choû-Fleur Au Gratin - Cauliflower Au Gratin


'Choû-Fleur' has an elegant ring to it doesn't it?  Well, it's simply French for cauliflower.  I love cauliflower in any form I can get it; raw on a crudité platter, soup, tempura, steamed.  Mostly, at my house, it gets steamed, mashed and seasoned with butter, salt and pepper.  That is my dinner many nights when I get home from work and am not super hungry.


I've been reading this book for quite some time now.  It was published by Gourmet Magazine in the 1950's and 1960's.  It's like a travel guide to the food in the different Provinces of France.  During those decades we in the United States were not as familiar with French cooking as we are now; thank goodness for Julia Child, so this served as an introduction to many basic French foods that are common place to us now. It's been a super interesting read and I have been having fun with basic French cooking through this book.  It was in this book that I found the recipe that I use as the base for any quiche I make.

Back to the cauliflower....  This evening I wasn't particularly hungry so I decided to do something with a head of cauliflower, oh, pardon me, choû-fleur, that I had in the fridge.  I decided to go very French basic.

Using this book I made Cauliflower Au Gratin.


Start with a nice, head of cauliflower.  Select one that is very white and void of a lot of brown spots.


Remove the green leaves and core the head.  Coring will help the separation into florets easy.


Separate the head into florets.  This is a pretty good size.


Rinse in a colander.


Place the cauliflower in a medium saucepan and cover with water. Bring the water to a boil and cook the  cauliflower until tender yet a little crunchy; about 3 to 4 minutes.  Pierce one of the larger pieces of cauliflower to test.  You don't want to cook it completely.  

Normally I would steam the cauliflower but I want to boil the cauliflower this time so I will have some cooking liquid to add to the sauce.  Drain the cauliflower and save 1/2 cup of the liquid.  Set the cauliflower aside.

Since this is a gratin, there is going to be a sauce that the cauliflower bakes in.  To be a proper gratin this sauce will form a crust on the surface of the cauliflower when baked.

So now we make the sauce.  The base of most French cream sauces is a Béchamel sauce.  In the U.S.  we all learned to make this in Home Economics class as a white sauce.

The sauce we'll make for our gratin is a Mornay sauce which is a Béchamel glorified with cheese and cooking liquid from whatever you are cooking with.


Let's make a basic Béchamel which is equal parts butter, flour and milk seasoned with a little grated nutmeg. For this recipe we are going to make 2 cups of white sauce.

Melt 2 Tbsp. butter in the same saucepan that you cooked the cauliflower.  Once the butter has finished bubbling, whisk in 2 Tbsp. flour and blend until you make a paste, or a roux.  Whisk off fire and allow to cook for a minute or two to rid the mixture of a floury taste.


Add 2 cups of very hot milk and whisk until smooth.  Return to fire and whisk until the sauce begins to thicken.

Now, here is where the Béchamel sauce becomes Mornay Sauce.  Add the 1/2 cup of reserved liquid that you cooked the cauliflower in.    Boil until you have reduced the sauce by a good quarter.  This is an important step.  If you don't do this your gratin might be a little watery (which in itself will not ruin this dish.  But not much can ruin this dish).


Stir in the Parmesan and Gruyère cheeses.  Return to a low heat and stir in make sure the cheeses melt.


Add the nutmeg.  Remove from the heat and finish the sauce with 2 Tbsp. butter.  (hey, remember this is a French dish.  There will be a lot of butter).


Coat the bottom of the dish with some of the Mornay sauce.


Fold the cauliflower into the remainder of the sauce and coat thoroughly.


Pour the cauliflower into the gratin dish and top with the reserved Gruyère cheese and bake in a 375°F. oven for 40 minutes or until the top is nicely browned.


This is so fabulous and will make the perfect side dish for any entreé.


Choû-Fleur Au Gratin - Cauliflower Au Gratin
Serves 4 to 6

Ingredients: 
1 head cauliflower
1/2 tsp. salt
4 Tbsp. unsalted butter, divided
2 Tbsp. flour
2 cups milk
1/8 tsp. ground nutmeg, preferably fresh ground
1/2 cup reserved cauliflower cooking liquid 
3 ounces Gruyere cheese, divided
2 ounces Parmesan cheese

Mise en Place:
  • remove green leaves from cauliflower, core and break into florets.  Rinse and set aside
  • measure out salt
  • divide butter in 2 Tbsp. portions
  • measure out flower and milk
  • measure out nutmeg
  • shred cheeses and set aside 1 ounce of the Gruyère from rest
  • equipment:  saucepan, colander and gratin dish
Method:
Preheat oven to 375°F.  Place cauliflower in saucepan and cover with water.  Add 1/2 tsp. salt to the water.  Bring to a boil and cook for 4 to 5 minutes until cauliflower is tender yet still crunch.  Reserve 1/2 cup of the cooking liquid and drain cauliflower in a colander.  Set aside.

Prepare the sauce.  In the same saucepan you cooked the cauliflower, melt 2 Tbsp. of the butter.  When the butter has stopped bubbling, pull saucepan off the heat and whisk in the flour until you have a roux.  Allow to cook off heat for a minute or two.  Heat the milk in the microwave for 3 minutes or until very hot.  Return pan to heat and add the milk to the roux and whisk until smooth and sauce begins to thicken.  Add the reserved cooking liquid and blend.  Cook sauce until it is reduced to by one quarter.  Pull pan off heat and whisk in the 2 ounces each of Gruyère and Parmesan.  Return to low heat and stir until the cheese is melted.  Add the nutmeg.  Pull pan off heat and finish off with the remaining two Tbsp. butter.

Cover the bottom of the gratin pan with some of the sauce.  Fold the cooked cauliflower into the sauce and stir to coat.  Pour into the gratin dish and bake for 40 minutes, or until top is golden brown.


Monday, September 29, 2014

Giving the Leftovers a Makeover


 For the most part I love leftovers.  Sometimes, however, foods aren't nearly as good as they were at their original cooking.  Take for instant a baked potato.  The white meat of that tuber will never be soft and fluffy as it was the night before.


corn on the cob is hard to get excited about as it was when you took it off the grill last night.


this is how I rescue leftovers to give them a second life.

peel the baked potato and slice in 1/2 inch slices, then slice those in half

slice the corn kernels off the cob

slice up half a yellow onion

and slice up a couple cloves of garlic


Melt the butter until browned then add the onions.  With a wooden spoon or utensil of your choice, delicately separate the onions.  Cook these over medium low heat until soft and limp.


Add the corn


Add the potatoes and the garlic


Sprinkle a pinch of smoked paprika over the top and gently stir.

Salt and pepper to taste.

With your wooden spoon scrape up the fond that will accumulate on the bottom of the pan and fold it in with the vegetables  This will really add flavor to the vegetables.


Mmmm.  The potato becomes creamy, the corn still pops and lends a little sweetness, the onions and garlic lend their flavor and the paprika gives it a little smokiness


Leftover Veggie Hash
Serves 4


Ingredients:
3 Tbsp. salted butter
One medium baked potato
1 medium roasted corn on the cob
1/2 medium yellow onion
2 to 3 small garlic cloves
pinch of smoked paprika
salt and pepper to taste

Mise en place:
  • slice off butter and place in saute pan
  • peel baked potato and slice cross-wise into 1/2 inch slices, then cut those in half
  • shuck corn and with a sharp knife slice down cob from top to bottom to remove kernels
  • peel and slide 1/2 yellow onion, slicing this from the side, not the end
  • peel and slice garlic cloves
Method:
Heat butter in saute pan.  When the butter begins to turn brown add the onions.  Cook over medium low heat until they become limp and start to brown.  Toss in the corn and combine.  Then add the potatoes and the garlic.  

Allow the vegetables slowly heat up and take on a nice color.  Sprinkle the smoked paprika over vegetables then salt and pepper to taste.

Tuesday, September 2, 2014

Grilled Peppers and Onions


I had a bell pepper, red onion and jalapeños that I needed to use up so I thought I'd make a side for myself to go with the Grilled Pork Chops with Apple-Bourbon Glaze that were prepared for our Labor Day meal yesterday.


I didn't use all of those jalapeños in the photo above;  I used 4 or 5 of the smaller ones.


I wasn't after the heat of the peppers so I removed the seeds and the veins. Be sure to wear gloves when preparing the jalapeños; especially if you wear contacts that will be removed  before you go to bed.


I simply wanted the nice jalapeño flavor with just a bit of a bite


Don't all of the colors look pretty when tossed together?  Drizzle them with a little olive oil and a sprinkling of celery salt.


I put them on the grill in a make-shift grill basket


Shake them up from time to time until they have browned and softened to your liking.


They were light and flavorful. The jalapeños  gave the dish just the kick I wanted and the garlic added another depth to the peppers.

The best part is I got to eat them all myself as Lovey and Kiss weren't interested.


Grilled Peppers and Onions
Serves 2

Ingredients:
1/2 medium red onion
1 orange bell pepper
4 - 5 small jalapeños
3 large cloves garlic
olive oil
celery salt

Mise en Place:
  • Slice onion
  • core, seed and slice bell pepper
  • seed, de-vein and slice jalapeños
  • peel and slice garlic lengthwise
 Method:
Toss all vegetables in a small mixing bowl.  Drizzle with a little olive oil and season to taste with celery salt.

Place vegetables in a grilling basket and cook on grill over medium-high heat.  Toss periodically and continue grilling until the veggies are browned to your liking.