Thursday, September 27, 2012

Chicken Roasted with Garlic - For Two

Roasting chicken is always an easy way to prepare a nice dinner and there are so many different ways to implement it.  This particular recipe caught my eye because of the garlic; the amount of garlic, that is.

The original recipe called for a whole head of garlic per person.  For Lovey and myself I used one.


To make peeling that many garlic cloves a little easier, pour boiling water over the separated cloves and let sit for about 10 minutes, drain and peel.  Dry them off well in a paper towel.


Combine softened butter with fresh herbs; I used chopped thyme.


Lovey prefers white meat so I bought him a whole, bone-in breast and for myself a leg/thigh quarter.  A third of the butter will be spread underneath the skin of the breast with the remainder spread on both sides of the chicken pieces and the bottom of the roasting pan (don't use a glass pan for this recipe).


Place the chicken pieces in the pan and toss the garlic cloves all around the chicken.


 After about an hour you'll have juicy, tender, and flavorful chicken.


This might be the best part of the meal though.  Like eating candy.  And good for you too!

Chicken Roasted with Garlic - For Two
Adapted from a recipe by Sally Darr of La Tulipe
Serves 2

Ingredients:
1 whold bone-in chicken breast skin on
1 - chicken leg/thigh quarter skin on
1-1/2 Tbsp. softened butter
1 Tbsp. chopped fresh thyme
1 head garlic

Mise en place:
  • bring butter to room temperature
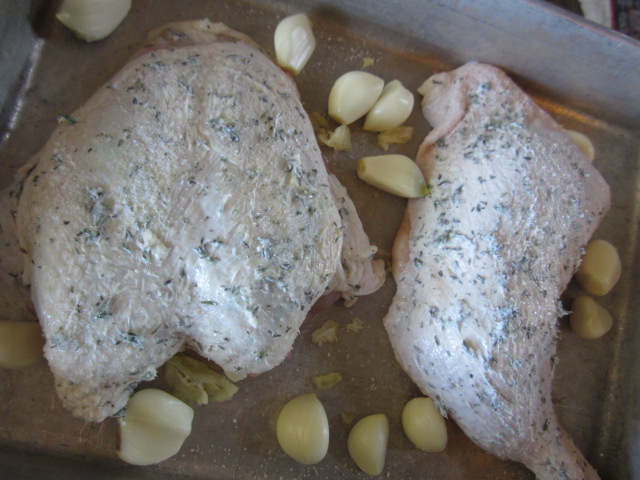
  • separate cloves from the head of garlic, place in bowl and pour boiling water over garlic cloves - set 10 minutes
  • rinse off chicken pieces and dry well
  • chop fresh thyme
  • peel garlic cloves and dry in paper towel
  • combine softened butter and thyme
Method:
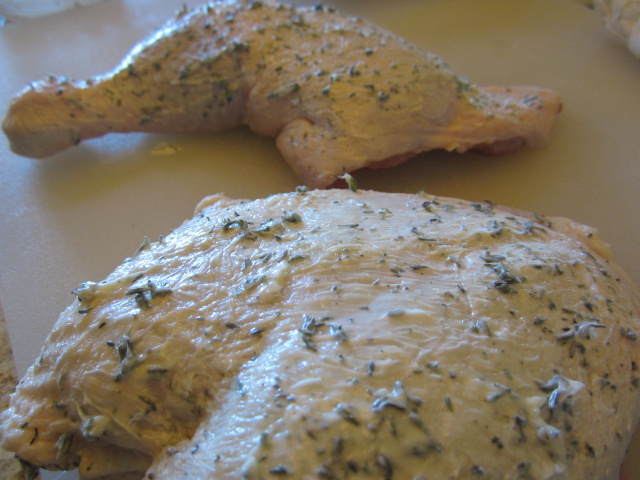
Preheat oven to 450°F.  Sprinkle both sides of chicken pieces with kosher salt.

Gently ease skin away from the chicken breast with your finger and spread one third of the thyme butter under skin.  Rub both sides of the chicken pieces with most of the remaining butter, reserving about a teaspoon.

Smear the reserved teaspoon of thyme butter in the bottom of a roasting pan (not glass).

Roast chicken, basting 3 to 4 times with pan juices, for a total of about 1 hour, or until the juices run clear when the meaty part of the thigh is pricked with a skewer or knife.  If the juices are pink, continue to roast chicken for 5 to 10 minutes longer (or at least 165°F on thermometer).

Place chicken on serving platter and allow to rest about 10 minutes before carving.

Tuesday, September 25, 2012

Broccoli in Sherry Sauce

Lovey and I eat a lot of broccoli.  Mostly we just steam it, butter it and eat it with a little squeeze of lemon juice.  Sometimes we like to sauce it up a bit.  This recipe is taken from a cookbook put together by the Fort Bend Junior Service League.  Fort Bend County is located around the Gulf Region of Texas in the Houston–Sugar Land–Baytown metropolitan areas.


The first thing I did was toast the almonds.  They'll add a nice crunch to the dish.


The broccoli is simmered in a little broth, drained and placed in a casserole dish.  The sherry sauce is poured on top of that and it's finished off with Parmesan and the toasted almonds.


Bake for about 20 minutes and you get this.

Broccoli in Sherry Sauce
Serves 6
Adapted from 'Treasures From the Bend'

Ingredients:
1-1/2 pounds fresh broccoli florets
3 cups chicken broth, divided
1/4 cups (1/2 stick) butter
1/4 cup all-purpose flour
1 cup half-and-half
2 Tbsp. sherry
2 Tbsp fresh squeezed lemon juice
3/4 cups (3 ounces) grated Parmesan cheese
1/3 cup slivered almonds

Mise en place:
  • toast almonds in small skillet on stove top
  • wash broccoli and cut into florets
  • measure out the chicken broth divided, 3/4 cup and 2-1/2 cup
  • squeeze lemon juice and measure into small bowl with sherry
  • grate Parmesan cheese
Method:
Preheat oven to 375° F.   Cook broccoli florets in the 2-1/2 cups chicken broth in a saucepan for 4 to 5 minutes or until tender-crisp; drain.  Place broccoli in a lightly greased 2 quart baking dish.

Melt the butter in a large saucepan over medium-high heat.  Whisk in the flour.  Cook for 1 minute, whisking constantly.  Whisk in the half-and-half and the 3/4 cup chicken broth gradually.  Bring to a boil and cook until thickened, whisking constantly.  Whisk in the sherry and lemon juice.  Salt and pepper to taste.

Pour the sauce over the broccoli and sprinkle with the cheese and almonds.  Bake for 20 minutes or until bubbly.

Monday, September 24, 2012

Potage Saint-Germain - Fresh Pea Soup

This is a clipping from my Boulder, Colorado days during the late1970's.  I worked in the Tax Shelter department at E.F. Hutton in Denver and they were always having promotions to encourage the brokers to sell certain oil and gas tax shelters available at the time.  One such incentive was a trip to Paris to those brokers who sold a certain amount in a promoted tax shelter.  There's nothing like a free trip to Paris to encourage brokers to extol the benefits of investing in an oil and gas deal to their clients.


During the campaign the office newsletter would include different French recipes.  I clipped this pea soup recipe and have made it numerous times over the years. 


You can use this basic technique to make a variety of cream soups using different vegetables.  Simmer whatever vegetables in chicken broth, pureé it, return to the pot, add butter and cream and heat through.  Many times it is what ever happens to be in my refrigerator that I needed to use of before it goes bad.  I fondly call it cream of vegetable drawer soup.


 It's an easy recipe and is one that you can make ahead through the blending process.  The recipe doubles nicely (which is what I did today).


It's such a bright, verdant color isn't it?


After the butter and cream are incorporated it becomes a lovely pastel green.

Potage Saint-Germain - Fresh Pea Soup
Serves 4

Ingredients:
2 cups frozen or fresh peas (~ a 10 ounce bag frozen)
1/2 cup sliced leeks (2 - 3 leeks)
10 spinach leaves (large leaves; not baby spinach - see note below)
1/2 small head lettuce (iceberg or Boston bibb)
a handful of flat parsley leaves
1/2 tsp dried chervil
1-1/2 cups chicken broth
3/4 cup light cream
2 Tbsp butter
Salt and grind pepper to taste

Mise en place:
  • Wash lettuce and roughly chop
  • Wash spinach until no grit remains
  • Rinse and thinly slice leeks (using only white part)
  • Rinse parsley
  • Rinse frozen peas
  • Measure chervil, cream and butter
Method:
In a Dutch oven, place the lettuce, spinach, leeks, peas, parsley and chervil.  Pour chicken broth over the top and stir to combine.  Simmer over medium heat, for about 20 minutes.

In batches, pureé the vegetables and broth in a blender.  Transfer to a saucepan.  Return saucepan to low heat.  Add butter and cream.  Stir gently until butter has melted and cream is incorporated.  Salt and pepper to taste.

Garnish with homemade croutons or pumpkin seeds.


Note:  The recipe calls for the larger, more mature spinach leaf rather than the baby spinach.  Yes, it's dirty and sandy and you'll have to wash it several times but I think it yields so much more flavor which will add more depth to the flavor of your soup.  If you opt to use baby spinach, you'll need to compensate for the amount.


Saturday, September 22, 2012

Double Hatch Omelette


One of the many things I love about weekends is that I get to cook a real breakfast.  During the week I pretty much stick to oatmeal and my Kashi Seven Whole Grain Puffs that I keep at the office.

For me, a real breakfast includes eggs, bacon, pancakes, waffles, hash browns, grits, biscuits and gravy or a combination thereof.

I dug into my stash of roasted Hatch chile peppers that I froze last month and a Hatch link sausage and made myself an omelette.

 I took the sausage out of its casing and cooked it up.


chopped up the roasted chile pepper


Once the eggs were set yet a little wet on the top, I added the chopped chiles


then the hatch sausage and cheese


fold the omelette over in the pan and turn it out on the plate.


Mmmmm....creamy, cheesy, spicy and stick to your ribs delicious!  No lunch needed.


Double Hatch Omelette
Serves 1 to 2


Ingredients:
2 large eggs
2 Tbsp. milk
1 link hatch chile sausage
1 roasted Hatch green chile
2 Tbsp shredded cotija cheese

Mise en place:
  • whip eggs and milk together in small mixing bowl
  • remove sausage from casing
  • rinse, seed, and coarsely chop the roasted chile
  • shred cheese
Method:
Sauté the sausage in omelette pan over medium heat until the meat is no longer pink.  Remove sausage, set aside and drain excess grease.  If your sausage was extremely lean and your omelette pan is not a non-stick one, add 1 Tbsp of butter.  When butter is bubbling and just beginning to turn brown pour in the egg/milk mixture.  With a soft spatula or wooden spoon gently pull edges of the setting eggs to the center and allow the non-set eggs to flow to outer edges of pan.  Repeat this procedure until most of the egg mixture has set, with the tops of the omelette being a little wet.

Sprinkle the chopped chile pepper onto one half of the eggs.  Top with the reserved sausage and sprinkle with cheese.

Gently fold omelette in half and roll out of pan onto serving plate.


Friday, September 21, 2012

Mexican-Style Granola

We're on our next to last week cooking up recipes by Rick Bayless over at I Heart Cooking Clubs.  With this week being "What's in your lunchbox?" week, I selected a granola recipe of Rick's that would be perfect for a kid's school snack as well as easy to take to the office to munch on during the day (a word of caution...this has peanuts in it if your child has an allergy).

My big 'child', a.k.a. Lovey, doesn't have to worry about that and he has really taken to this snack.  He has been enjoying it with his cappuccino in the morning.


We have our nuts:  blanched almonds, raw peanuts, pumpkin seeds, and raw cashews.  I couldn't find whole almonds that were blanched, nor could I find raw peanuts without the brown papery skins on them.  No worries.  I can improvise without stressing; hey, it's granola.


We have our grains:  old-fashioned rolled oats and amaranth.  The amaranth called for in the recipe was puffed amaranth.  Not only did I have to educate myself on what amaranth is I also could not, for the life of me, find it puffed.  I found numerous boxes of amaranth flakes but no puffed.  Once again, no worries, it's still granola.

According to my favorite online food dictionary, amaranth was once considered a weed but is now acknowledged as a nourishing high-protein food.  The seeds are used as cereal (puffed or flaked) or ground into flour.


Finally, we have our coating and binding agents:  vegetable oil and honey


Gently combine the nuts and grains, right on your baking sheet.  Make sure your baking sheet has sides.  This mixture will be baked for a short time before adding your coating.


Thoroughly combine the oil and honey and pour over the warm granola mixture.


Stir to coat all of your ingredients.


Bake it up


Pack it up
Eat it up


Mexican-Style Granola
Makes about 3 cups
Recipe adapted from Rick Bayless'  Mexico - One Plate at a Time

Ingredients:
1 - 1/2 cup old-fashioned rolled oats
1/4 cup peanuts (the kind with the reddish skin removed), preferably raw
1/4 cup blanched almonds
1/4 cup hulled pumpkin seeds, preferably not toasted
1/2 cup puffed amaranth or amaranth flakes
1/4 cup cashews, preferably not toasted
3 Tbsp. vegetable oil
1/4 cup honey

Method:
Heat the oven to 300 ° F.  On a baking sheet with sides, combine the oats, peanuts, almonds, pumpkin seeds, amaranth and cashews.  Bake for 10 minutes.

In a small bowl, combine the oil and honey, stirring to thoroughly combine.  Drizzle over the warm mixture, then stir until everything is evenly coated.  Return to the oven and bake, stirring every few minutes, until the mixture is a rich golden brown and the nuts smell toasty - about 20 minutes.  Cool completely then store in a tightly closed container.

I'm sharing this post at IHCC

Tuesday, September 18, 2012

A Picnic Pea Salad


I don't recall where or when I came across this pea salad.  I do know it's pretty old because I typed the recipe out on an IBM Selectric.  The salad's a nice diversion from the usual stand-by's of potato salad and black-eyed-pea salad that I seem to gravitate to when asked to bring a salad to the picnic or pot luck.  I made this recently for a family get-together over Labor Day weekend.

I refer to it as a pea salad but there are other goodies in here too, like french cut green beans, shoe peg corn, pimientos, bell pepper, celery, red onion.  Just a note about the onion....this year the red onions I've bought have been e.x.t.r.e.m.e.l.y potent.  I used half the called for amount and diced them a little tinier than the other vegetables.


All of the vegetables are mixed together in a large bowl and tossed with a sweet mixture of white vinegar, vegetable oil, sugar, salt and pepper.


It's a great make-ahead recipe.  In fact, I start mine two days prior to serving. The dressing is cooked and needs to be cooled before mixing it with the vegetables.  I like to chill it in the refrigerator overnight.

Then, once the salad is mixed together the flavors meld nicely when refrigerated overnight.

The next morning you don't have to worry about preparing anything but yourself for the party!  Just grab it from the 'fridge and go!

Picnic Pea Salad
Serves 12

Ingredients:
For the Dressing -
3/4 cup sugar
3/4 cup white vinegar
1/2 cup vegetable oil
1 tsp salt
1 tsp freshly ground pepper

For the Vegetable Mixture -
4 ribs celery
1 red bell pepper
1 medium sized red onion
1 - 4 ounce jar diced pimientos
1 - 16 ounce can Lesueur sweet peas
1 - 16 ounce can French style green beans
1 - 12 ounce can white shoepeg corn

Mise en place:
  • Just go a-head on (as they say in West Texas)  to the "Method".  Once you've prepared all of your ingredients they're dumped in their respective receptacles as you go anyway!
Method:
Measure out all ingredients for the Dressing into a small saucepan.  Stir the ingredients as you bring them to a boil.  Remove from heat and allow to cool to room temperature.  Refrigerate overnight if desired. 

Dice celery, bell pepper, and onion (mine are usually ~ 3/8") and transfer to a large mixing bowl.  Drain the pimientos, peas, green beans & corn and dump in the mixing bowl.

Gently fold to combine all of the vegetables (better done with hands).

Pour the cooled dressing over the vegetables and gently fold to mix.  Transfer to a storage container with lid and refrigerate overnight.

The longer the salad marinates, the better the flavor.

Saturday, September 15, 2012

Sangria Mexicana ~ Red-Wine Cooler with Fresh Lime

September 16 is Mexico Independence Day.  It's similar to our July 4th.  In honor of our friends' to the South special day I made Mexican Sangria.  The recipe is from Rick Bayless' Season 6 of Mexico - One Plate at a Time.


A refreshing  and sparkling drink, it's a little different from the Sangria I'm accustomed to where lemons, limes and oranges are used.  This recipe focuses on only the lovely lime.


 Fresh lime juice, sugar, dry red wine and sparkling water are all you need.


Sangria Mexicana
From Season 6 of Rick Bayless' Mexico - One Plate at a Time
Serves 6

Ingredients:
2/3 cup freshly squeezed lime juice (4 to 5 wines)
2/3 cup sugar
3 cups dry, fruity red wine (I used a Pinot Noir); you can also use Beaujolais or Zinfandel
1 cup sparkling water + 1/4 cup to use for the lime syrup
4 to 6 wheels of lime, with a cut made on one side, for garnish

Mise en Place:
  • chill wine
  • juice limes
  • measure out sugar
  • measure out sparkling water, divided
Method:
In a small bowl, mix the sugar, 1/4 cup of the sparkling water and the lime juice.  Stir until sugar is completely dissolved.

Just before serving pour the wine into a pitcher and stir in the sparkling water and lime syrup.  Serve over ice in tall glasses, each garnished with a wheel of lime slipped onto the rim.

I'm sharing this post at I Heart Cooking Clubs.  Hop on over and see how everyone else is celebrating!


Monday, September 10, 2012

Thyme Mango Sorbet

The perfect little palate cleanser when you serve a six course meal.  What?  You don't serve six course dinners on a regular basis?  I don't either.  But you can still enjoy sorbet without all the fanfare of a fancy dinner.

The base of a Sorbet is fruit juice, fruit pureé, wine, liqueur or tea infusions.  Mixed with a simple syrup and frozen.  Easy - peasy.

Every so often I go through my freezer and use up what I've stored over the past months so I can free up space.  Since the holidays are creeping up on me I decided to do just that.  I found a bag of frozen mango and here's what I came up with.


Make your simple syrup first because it needs to be cooled.  I made mine the night before and stored it in the refrigerator.

Place the fruit and the simple syrup in a blender and pureé until very smooth.  That's it.  You're done.  Almost.

Pour the mixture into an ice cream maker and flip the switch.  Now you're done.

Thyme Mango Sorbet

Ingredients:
1 cup sugar
1 cup water
5 sprigs fresh thyme
1 package frozen mango or 3 fresh mangoes

Mise en place:
This recipe is so simple, there's really no extra prep work to do.

Method:
In a small sauce pan, bring sugar, water and thyme to a boil until sugar is completely dissolved.  Remove from heat and allow to cool.

Put fruit in the blender.  Add the simple syrup.  Blend until very smooth.  Pour mixture into ice cream maker and mix for about 25 minutes.  Transfer to a plastic container and store in freezer.

Saturday, September 8, 2012

Fresh Melon Cooler

 
With Summer winding down the watermelons will soon disappear in the markets. I bought one today knowing it is probably the last I'll buy for the season.  I also took the opportunity to use the watermelon for my I Heart Cooking Clubs' weekly assignment which is Esta Roja!  Watermelon is a shade of red, no?


You can make this with other melons such as cantaloupe and honeydew.  The cool green of a honeydew would make a pretty cooler.

You can also use this cooler as a base for a simple cocktail by adding vodka or champagne or simply making it a sparking, non-alcoholic spritzer by adding Perrier.


Place all of your ingredients in a blender and push the button.  Simple as that.  Adjust for your desired texture and taste by adding extra sugar, water or lime juice.  My watermelon was so nice and sweet it didn't need any added sugar.  I also used the juice from the watermelon as part of my water.


Let your cooler chill in the refrigerator before serving.  The colder the better!!


Fresh Melon Cooler
Makes about 1 quart
Recipe from Season 3 of Rick Bayless' Mexico - One Plate at a Time

Ingredients:
4 cups (packed) fresh melon (watermelon, cantaloupe, or honeydew)
1/2 cup water; plus more if necessary
1/4 cup sugar; plus more if desired
About 2 Tbsp lime juice; plus more if desired

Mise en place:
  • peel, seed and roughly chop up melon
  • measure out water
  • measure out sugar
  • juice lime
Method:
Scoop the fruit into a blender, then add the water, sugar and lime juice.  Blend until smooth.  Add more water, if necessary, to achieve a light easy-to-drink consistency.  Taste and season with more sugar and lime if you think necessary.

You can also add extra flavorings (mint to honeydew, orange juice to cantaloupe, and blended raspberries to watermelon) if you like.


I am sharing this recipe at IHHC.

Saturday, September 1, 2012

Hatch Chile Time in Texas!


They’re Baaaaaaaack!!  You can tell what time of year it is when you see the roasters cranking up in the parking lots of Central Markets and Whole Foods across the Southwest.

 
Hatch Chile Festival time!  And people who love them can do a happy dance.


The last half of August welcomes the Hatch Chile season in the Southwest.  And it's celebrated in a big way for a couple of weeks.

To be called a Hatch Chile it must be grown in the vicinity of the town of Hatch, New Mexico.  They grow them hot and they grow them mild; the mild still have a nice bite to them.  But their flavor is so wonderful and when they are roasted they are even better.


The Roasters are set up in the parking lot of Central Market in Fort Worth.


They roast 2 cases at a time and they are roasted to perfection in about 4 minutes.

Even if I don’t have recipes in mind at the time I always grab a carton that have been roasted in the parking lot. You can use them for so many things.

You pair them with eggs in any form, omelets, fritattas, scrambles, and on and on.  Queso, enchiladas, soup (a great way to use them).  You can even make a tea with them for sore throats.


I freeze some so I can enjoy them for several months.  I rinse the charred skins off them and put 3 to 4 in a quart size baggie and freeze.  Make sure you press all of the air out of the baggie.  You can also seed them first, but I just leave the seeds and deal with them later.