Friday, February 17, 2012

I am a Clipoholic - Creamy Lime Pie

Just shoot me, OK?  I have this box full of clippings as well as


these cookbooks and magazines to cook through.

Why, I ask you, do I still find the need to cut and clip!?!  It's an addiction and I'm hopeless.

Still unpacking things, I came across an old radio that belonged to my in-laws.  Lovey had it restored about 15 years ago and it's been packed away since.  It actually works so I thought I would make use of it and get rid of another box in the storage room.

Here is the box it was packed in.

Uh Oh..look what it was packed in.  I started shaking and broke into a cold sweat.  I ran to the kitchen, downed a couple shots of Bourbon (not really), went back to the pantry, sat on the floor and proceeded to go through the papers to see if there were any recipes.  I'm just pitiful, that's what I am.  I found I was reading the August 17, 1996 edition of The Rockport (Texas) Pilot.

I found one (lowering head in shame); and it's a microwave recipe; I don't cook with a microwave.  I re-heat leftovers in the microwave.  Why am I cutting this out?

How I justified it:  Lovey adores Key Lime Pie and he also likes for me to, when possible, try and make desserts a little healthier to eat.  In reading through the recipe that this Creamy Lime Pie called for those 'eggs in a milk carton'-type product  (I used Egg Beaters) and sweetened condensed skimmed milk.  So, what the hey, I thought I'd try it.


I don't know why it bothers me to cook in a microwave.  Perhaps it's one of those things I'm uncomfortable with simply because I'm not well educated on the technique.

Anyway, this was super easy to put together.  The crust was made and pre-cooked in the MW and came out looking great but cooked it a little too much around the outside edges.  I did use butter instead of the called for 'regular margarine'.  Could this have been the reason?  Alton Brown, where are you?

The recipe also called for 5 drops of green food coloring but I stopped at 2; otherwise it would have been a bright kelly green.

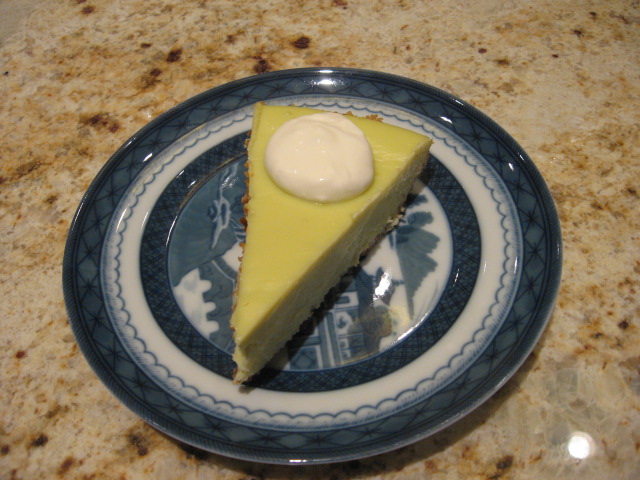
All in all, this was a really nice pie.  It was super thick and creamy and was significantly different from my Key Lime Pie.  As I suspected, the crust was a little overdone on the bottom because it had to be chiseled out at the edges (that's why, in this photo, the pie sort of leans back; half of the crust was left in the pie plate).  It wasn't burnt, just caramelized a bit too much.

Creamy Lime Pie

Ingredients:
1-1/4 cups graham cracker crumbs
2 Tbsp. sugar
1/4 cup regular butter, melted
1 carton (8 oz., 1 cup) refrigerated real egg product
2 cans (14 oz. each) sweetened condensed skimmed milk
3/4 cup fresh lime juice (about 6 limes) (I only had to use 3, but mine were big limes)
1-1/2 tsps. grated lime peel
5 drops green food coloring (I used 2 drops)
Whipped cream for topping

Mise en Place:
  • wash limes, dry and grate enough peel for the required amount
  • squeeze limes
  • open your cans of condensed milk
  • melt the butter
  • measure out remaining ingredients
Method:
Stir together graham cracker crumbs, sugar and melted butter.  Press evenly and firmly into 9-inch glass pie plate to form shell.  Microwave at HIGH (100%) for 3 to 3-1/2 minutes, rotating plate a quarter turn after every minute.  Cool.

In medium-size bowl, stir together egg product and condensed milk.  Gradually stir in lime juice.  Stir in lime peel and food coloring.  Pour into cooled pie shell.

Microwave at MEDIUM (50%) for 15 minutes or until set, rotating pie plate a half turn after every 5 minutes.  cool and chill until serving time.  Garnish with whipped cream.
Monday, February 13, 2012

Pane al rosmarino e olio


It's been rather chilly and damp in the DFW area and soups seem to call out to me during this kind of weather.  Last week was another potluck week at IHCC (I'm late posting this) and I selected a bread to go along with a beef barley soup I made.

Tessa Kiros' Bread with Rosemary and Olive Oil is from her Twelve cookbook.  Tessa says that this recipe is a variation on the unsalted white Tuscan bread that's generally made where she lives.  She also mentions you can make small individual rolls with this recipe.

It was easy, quick and the texture is as soft as white Wonder Bread.

It is also great toasted with a big chunk of butter slathered on it.  Mmmmm...excuse me.  I think I'll go cut me another slice.

Pane al rosmarino e olio - Bread with rosemary and olive oil

Ingredients:
1 ounce rosemary sprigs
1 ounce fresh yeast (I used 1/2 oz. active dry yeast since I didn't have fresh)
a pinch of sugar
1-1/4 cups tepid water
1 pound 2 ounces bread flour
1/2 Tbsp. salt
1/4 cup olive oil

Mise en Place:
  • strip the rosemary leaves off the stems and discard the stems
  • measure out remaining ingredients
Method:
Put the yeast into a bowl with the pinch of sugar.  Stir in the water and leave it to activate.

Put the flour into a large, wide bowl or onto your work surface .  Add the yeast, most of the rosemary, the salt and most of the olive oil, and mix well to incorporate.  Knead the dough for about 10 minutes, or until you have a smooth, compact, elastic ball.  (I used my Kitchen Aid bowl and used the flat paddle to incorporate then the dough hook for kneading).  Add a few more drops of water or a little more flour if necessary to achieve this consistency.

Put the dough into a bowl, cover and leave to rise in a warm place for about 1-1/2 hours, or until it has doubled in size.

Dust your work surface lightly with flour.  Divide the dough into halves or leave whole, and shape into ovals or rounds (I made 1 large loaf).  You can also make small, individual rolls by breaking off chunks of the dough and rolling them into balls.  Sprinkle the tops with the remaining rosemary and drizzle with the remaining oil.

Dust a baking tray with flour and put the bread loaf(ves) onto the baking tray, allowing for some space between each loaf for spreading.  Use two trays if necessary, and cover the bread loosely with a cloth.  Leave in a warm place for 30 minutes to an hour until the loaves have risen. 

Meanwhile, preheat the oven to 200°C (400°F/gas 6).  Put the baking tray into the hot oven and bake for about 35 minutes, until the top is golden.  The bottoms of the loaves should be golden and sound hollow when tapped.

Remove to a rack to cool slightly before serving.  When cool, the bread can be wrapped in plastic wrap and frozen for future use.

Friday, February 10, 2012

Random Cooking Tips-Removing Kernels From an Ear of Corn

Last week I made Lovey a Bison Shepherd's Pie.   Just like my regular but with Bison.  Notice I don't say regular and not traditional because the traditional Shepherd's Pie is made with lamb; and Lovey won't eat lam.

As I was getting all of my ingredients together and prepped, I thought I'd show you how I get the kernels of corn off the cob (I initially typed 'cornels of kern'  - I don't know why I do things like that.  I've also been known to say 'Liquid Lumberdators' instead of Lumber Liquidators).

Anyway...

My dad called me one day and told me about this clever way to perform this little task so the kernels didn't fly across the room as they were sheared off the cob. 


All you need is a Bundt pan, or other tube pan.  This one is actually a smaller version of the regular size.  Hold your shucked corn cob into the center hole and start slicing from top to bottom.  The kernels fall right into the pan.

Now Lovey can eat his Shepherd's Pie with the peace of mind that half the kernels weren't on the floor first.

Thursday, February 2, 2012

Salmon Ceviche with Cilantro, Chili, and Lime

It is "some like it hot - and spicy" week a IHCC.  Since Mr. C., or as I like to call him - Lovey, does not like anything spicy, I knew I'd have to find one of Tessa Kiros' recipes that I could easily half and take to work with me for my lunch.


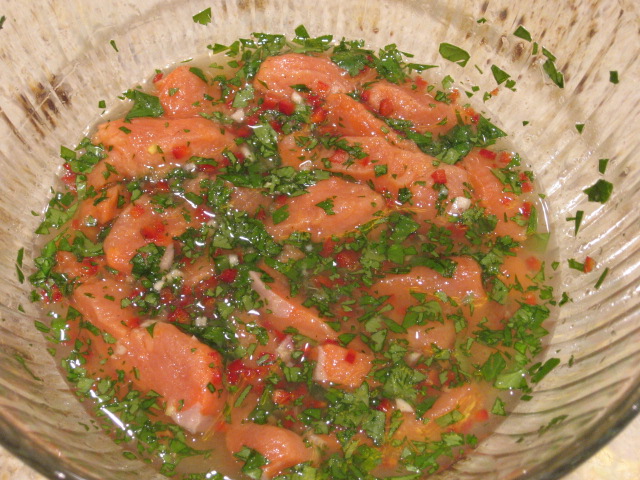
 I chose this ceviche recipe.  I love ceviche and I love all these ingredients so the selection was an easy one.  The lime, ginger and cilantro flavors with the light, delicate texture and flavor of the Coho Salmon were a perfect pairing.

The recipe halved easily but I could have used the original amount of red chile peppers for a little spicier dish.  Perhaps if I had left the veins there would have been more heat.


 Notice I'm wearing my food gloves that I love to use in the kitchen?  I suggest using these in so many ways when cooking, and especially when working with chiles and peppers since they have oils that can burn your skin and especially your eyes. 


 This was so easy to prepare.  Take care to mix it up in a nonreactive bowl.  Since I made this dish to take to work the next day, I stored it in a Ball jar for easy transporting.


Tessa states that this is even good the next day so I had no problem making it the night before.  She also suggested a lovely way to serve it with some firm green leaves and sliced red onions as a salad or with boiled potatoes.  For myself, I just ate it out of the jar at my desk and it was yummy!

Salmon Ceviche With Cilantro, Chili, and Lime
Adapted from "Falling Cloudberries" by Tessa Kiros
Serves 4 to 6 - Note: this is the full recipe as in the book

Ingredients:
1-1/4 pounds skinned salmon fillet
Juice of 4 limes
2 or 3 red chiles
2 Tbsp. chopped fresh cilantro
1/4 tsp. ground cumin
2 garlic cloves
1-1/2 inch piece of ginger

Mise en Place:
  • skin and remove any bones from the salmon
  • juice limes
  • seed and finely chop the chiles
  • chop cilantro
  • peel  & finely chop garlic cloves
  • peel and grate fresh ginger
Method:
Slice salmon fillet into pieces about 1/2 inch thick and put in a wide, nonreactive bowl.

Pour the lime juice, chile, cilantro, cumin, and garlic over the fish and season with salt and pepper.  Take the grated ginger between your fingers and firmly squeeze the juice over the salmon (discard the pulp that's left).  Mix gently, cover with plastic wrap, and refrigerate for at least 4 hours before serving.

I'm sharing this recipe at IHCC

Friday, January 27, 2012

Beef Casserole With Carrots, Onions, and Cream

This week's IHCC theme is a potluck choice of any recipe from one of Tessa Kiros' cookbooks.  I selected a beef dish from her book Falling Cloudberries.  Tessa writes that this is an adaptation from a popular Finnish dish called Karelian stew.  She also points out that you can add a few fresh herbs or other spices to the pot and even use a mixture of meats (veal, beef, and pork).

It couldn't have been easier and goes to prove that a good tasting meal can be derived from the simplest of ingredients.  And speaking of ingredients, here is the cast of characters for this recipe.

Topside of beef, carrots, onion, parsley, bay leaf, allspice, and cream.
Wouldn't it be nice if you could purchase tiny bundles of parsley instead of  huge amounts? 


Throw everything except the parsley and cream into a heavy casserole.  The recipe calls for 8 allspice berries.  I only had ground allspice so I closed my eyes and imagined what 8 berries would look like after I ground them up; then I measured out a teaspoon and threw it in the pot.  As you can tell, I'm very scientific in my methods.


Next, pour about 3 cups of water or enough to come 3/4 of the way up the side of the meat.


Cover the casserole and bake at 350°F. for about two hours.  Turn the meat a couple of times during that period.


After two hours the meat should be very tender.  Remove the meat to a resting plate and cover with foil.  Discard the bay leaf and berries (if you actually had berries).  Remove the carrots and onion and measure out 3 cups of the liquid.  My liquid actually measure out to exactly 3 cups.


I admit I became somewhat giddy when I read the instructions to use a food mill to pureé the carrots and onions.  I love this kitchen tool of mine and I don't use it a lot.  However, it was just not happening with the onions; I wasn't getting the result I wanted.


So I dumped it all in the blender with a little bit of the juices and pureéd until it was smooth.


I whisked the pureé into the cooking liquid (that I had poured into a small saucepan) and added the parsley and cream.  While that was heating up I sliced the meat and plated it up with some egg noodles.  As instructed I ate the sauce like it was soup poured lots and lots of sauce over the meat as well as the noodles.


Beef Casserole With Carrots, Onions,and Cream
Adapted from "Falling Cloudberries" by Tessa Kiros
Serves 4 to 6

Ingredients:
3-1/4 pound piece of lean silverside or topside of beef
2 large carrots
1 large red onion
About 8 Allspice Berries (I used 1 tsp ground Allspice)
1 bay leaf
1/2 cup heavy whipping cream
2 Tbsp. chopped fresh parsley

Mise en Place:
  • rinse and pat dry the beef
  • peel carrots and cut in 1-1/2 to 2 inch chunks
  • peel onion and cut into quarters
  • chop parsley
  • measure out cream
  • measure 3 cups of water
Method:
Preheat your oven to 350°F.  Put all the ingredients except the cream and parsley into a heavy casserole dish and add about 3 cups of water, or enough to come about three quarters up the side of the meat.

Cover the casserole dish and bake for about 2 hours, turning the meat over a couple of times until it is really soft.  Remove from the oven.  Lift out the carrots and onions with a slotted spoon and pass them through the fine disk of a food mill, or pureé them (I pureéd mine in the blender).  Discard the bay leaf and allspice berries from the casserole.  Remove the meat from the casserole and keep warm.

Measure about 3 cups of the cooking liquid and return this with the pureéd vegetables to the casserole (you can freeze any leftover cooking broth for another use).  (Note:  my liquid actually measured out to exactly 3 cups).  Add the parsley and cream to the liquid and heat through.  Adjust the seasoning if necessary.  Serve the beef in thick slices and serve with a lot of sauce poured over it.

I am sharing this recipe over at IHCC


Wednesday, January 18, 2012

Lemon Ginger Chicken

If you like lemon and you like ginger, this recipe allowed both flavors to shine individually while at the same time you have that combination of both melded with the brown sugar that produces a near candy-like taste in your mouth.

I cut this recipe out of the Parade magazine that comes with your Sunday paper.  Is this magazine still stuffed inside the Sunday paper along with all of the coupons and flyers?  It's been so long since I've actually bought a Sunday paper I couldn't tell you.


Here's what we'll start with:  chicken, lemon, fresh ginger, fresh lemon juice, garlic, lemon extract, flour, ground ginger, paprika, salt, black pepper, chicken broth, light-brown sugar and corn oil.  My oil might look a little questionable to you, with writing on the label and all.  I recently used that oil to fry up a boat load of okra.  I save my oil in the refrigerator and re-use it until I cook something like fish or shrimp.  I also save bacon drippings in a jar in the refrigerator.  I'm frugal that way.


The first order of business is to cut up your chicken into 8 pieces, rinse and pat dry.  I saved the back and gizzard and made a couple of cups of stock for another time.

Combine all the ingredients for your marinade, which is the fresh lemon juice, garlic, fresh ginger and the lemon extract.  Pour this over your chicken in a large bowl and toss (good time to be wearing your kitchen gloves!).  Cover the bowl with Saran wrap and refrigerate for 2 hours.


While your chicken is marinating, pour the oil into the sauté pan.  Mix the flour, ground ginger, paprika, salt and pepper in a paper bag, and measure out your chicken broth and brown sugar.

See the circle of what, at first glance, looks like foam?  That's actually a little cornmeal used in frying the okra that escaped through the strainer.  This oil is cold and the cornmeal almost immediately formed this halo.  Alton Brown, please explain this phenomenon to me.  I know there must be an explanation and I know you'd have the answer.

Okay, now you can heat up your oil.


Remove the chicken pieces from the marinade and pat dry (save the marinade!!).  Place several pieces at a time in the paper bag and shake to coat in the flour mixture.  Fry chicken in batches


until it's golden and crispy.


Place browned chicken in a roasting pan and pour the broth and the reserved marinade in the bottom of the roasting pan.  Pat the brown sugar on top of the chicken pieces then top with your finely sliced lemon slices.

I love Meyer lemons so I used those for my thinly sliced lemons to top the chicken.

Bake for 45 minutes, uncovered, in a 350°F oven.  Baste once after 20 minutes.


This is a great chicken dish hot from the oven so serve immediately.  The original recipe suggests it is just as good the day after, at room temperature.  We did have it as leftovers (heated), but I might suggest before storing overnight, I would remove the lemon slices; they tend to turn bitter.

One other thing about this recipe...make sure you have the 2 hours for marinating this recipe.  You don't want to marinate the chicken in it over night because it will partially cook your chicken.  You will notice a little bit of a change in the chicken just in that 2 hours.

Also, the recipe says it serves 2.  ????.  Maybe if you're really, really hungry.  I think it can easily serve more when you serve with a salad and a side dish.  But hey, it's up to you in the end.

Lemon Ginger Chicken
Serves 2

Ingredients:
1 chicken (2 pounds), cut into 8 serving pieces
1 cup fresh lemon juice - about 3 large lemons
4 cloves of garlic, peeled and minced
4 tsp. fresh ginger, peeled and finely chopped
1 tsp. lemon extract
1 cup all-purpose flour
2 tsp. ground ginger
1 tsp. paprika
1 tsp. salt
1 tsp. black pepper
2 cups corn oil
1/4 cup chicken broth
4 Tbsp. light-brown sugar
2 lemons, slice paper-thin (I used Meyer lemons)

Mise en Place:
  • Cut, rinse and pat dry the chicken
  • squeeze lemons for fresh juice
  • mince garlic
  • peel and finely chop the fresh ginger
  • combine your flour ground ginger, paprika, salt, and pepper in a paper bag (or large baggie)
  • measure out your corn oil and pour in sauté pan
  • measure out chicken broth
  • measure the brown sugar
  • slice the 2 lemons paper thin (I used a mandoline)
Method:
Wash chicken pieces well and pat dry.  Place in bowl.

In a small bowl combine lemon juice, garlic, fresh ginger and lemon extract; pour over chicken, toss well and marinate in refrigerator for 2 hours.

Preheat oven to 350°F.

Remove chicken from marinade.  Pat dry.  Reserve marinade.  Fill a paper bag with flour, ground ginger, paprika, salt & pepper.  Place chicken pieces in bag, two at a time, and shake to coat.

Heat corn oil in a 10-inch sauté pan until very hot.  Fry the chicken until golden and crisp - 5 to 7 minutes.  When all chicken has been fried, discard oil. (whatever)

Place chicken, skin-side up, in a roasting pan.  Pour chicken broth and reserved marinade into bottom of pan.

Sprinkle brown sugar evenly over chicken pieces.  Pat slightly.  Arrange lemon slices evenly over the chicken.

Bake uncovered 45 minutes, basting once after 20 minutes.  Serve immediately.

Monday, January 16, 2012

Risotto con zucchini

Aside from being one of the most delicious dishes on earth, there are several other reasons I love risotto.  The possibilities of what you can add to it are endless;  it can be a side dish or your main entreé;  it's an easy technique; and, it's the perfect therapy for those cooks who feel the urge to stir the pot every nanosecond.

I'm cooking another recipe from this beautiful cookbook "Twelve ~ A Tuscan Cook Book"  by Tessa Kiros.  It's 'Rice is Nice' week over at I Heart Cooking Clubs.  If you pop over there you can read all about Tessa and see what the other gals selected for this week's recipe.


Here we have all of our ingredients ready to go.  The stock is on the burner getting hot.  Ready to throw in the other bit pot are the onions, garlic, zucchini, parsley, basil, arborio rice, wine, butter, and Parmesan cheese.


 In hot olive oil, sauté the onion until it begins to soften


 Toss in the garlic and cook for another minute


 Toss in your zucchini and season with salt and pepper.  Toss to coat with the olive oil.  Toss in half of the parsley and basil and combine.


 Add the rice and stir with a wooden spoon, which will become your best friend, so that the rice is coated with the oil.  Let cook for a couple of minutes.  Pour the wine and cook until the wine has evaporated. 


A little side note here...  see this little gadget attached to the rim of the dutch oven?  It's one of my favorites and is the handiest little thing ever to hold your cooking utensil!!  Christanne & Char are always giving me fun and useful gadgets for the kitchen.   Okay, back to cooking.


 Begin to add stock to the rice a ladle or two at a time.  Stir with your wooden spoon, making sure to scrape the bottom of the pan so the rice doesn't stick.  When the rice has absorbed all the liquid, add some more ladle by ladle.  See how there is still liquid when I push my spoon across the bottom of the pot?


 Now, see how the liquid has absorbed?  It's magic.


 Once your rice has reached the consistency that you want, which is creamy, yet slightly firm and a little bit of liquid left, you can finish off your risotto.  Stir in the butter, Parmesan cheese and the remaining parsley and basil leaves.


See how creamy this is?  Delicious!  Here's the recipe for you.

Risotto con Zucchini
Serves 6

Ingredients:
6 cups vegetable stock
4 Tbsp. olive oil
1 medium white onion, peeled & finely chopped
2 garlic cloves, peeled & finely chopped
1 pound, 5 ounces small zucchini (courgettes) trimmed & finely sliced
a handful of chopped fresh parsley
about 6 basil leaves, roughly torn
1 pound, 2 ounces risotto rice
1 cup white wine
1-3/4 ounce butter
1/2 cup Parmesan cheese, plus extra for serving

Mise en Place:
  • Pour stock in large pot and begin heating on stove
  • chop onion
  • chop garlic
  • slice zucchini
  • chop parley
  • tear basil
  • measure out your wine, butter and Parmesan
Method:
Heat the stock in a saucepan on the stovetop.

Heat the olive oil in a large heavy-bottomed separate saucepan suitable for risotto, and add the onion.  Sauté until it has softened slightly, then add the garlic.

Sauté for another minute.  Add the zucchini slices, season with salt and pepper, and cook on a gentle heat for a few minutes.  Toss in half of the chopped parsley and basil.  Add the rice to the pan and stir to coat with a wooden spoon, cooking for a minute or two.

Add the wine and when it has evaporated, add a ladleful or two of hot stock.  Stir, taking care to move all the rice at the bottom of the pan to avoid sticking.  When the rice has absorbed the liquid, add more stock and stir.

Continue in this way until the rice has achieved the right consistency, which should be creamy, yet slightly firm and a little liquid.  If you run out of broth, continue with hot water.  Taste the risotto after 20 minutes -- it may need another 5 minutes or so.

Stir in the butter, Parmesan cheese, the remaining parsley and basil leaves.  Serve immediately with extra grated Parmesan cheese.

I am sharing this post with I Heart Cooking Clubs