Sunday, May 6, 2012

Crispy Chicken Tacos with Tomato Broth

Lovey's favorite thing to eat when we go to a Mexican Restaurant are Chicken Taquitos or Flautas. 

I found this recipe for Crispy Shrimp Tacos, adapted from Rick Bayless' Fiesta at Rick's.  I substituted chicken for the shrimp.  I also don't add the Jalapeños when making for Lovey.  I personally think a little heat amps up the flavor.

Mr. Bayless calls these tasty cylinders crispy tacos.  In the land of Tex-Mex we call them taquitos.  Out of respect of Rick's recipe (and the fact that he is an expert in Mexican cuisine and I'm not) I will call these tacos.


Main ingredients for our filling are chicken tenders, tomatoes, onion, garlic, cumin, cilantro and salt


The filling is easily prepared in a large skillet.  The majority of the preparation time is cutting and chopping up all of the ingredients.  After that it all goes together quickly.  Once the filling is finished, remove it from the heat and let it cool. 

A good time to make the tomato broth is while the filling is cooling off.
Begin by roughly chopping onion, tomato and garlic and pureéing it in a blender.  Make it nice and smooth.  Pour the puree in a skillet with some olive oil, add your broth and let it reduce.


This broth is so over the top good and triples the goodness of the tacos.  This can be used with so many recipes.  I ate the leftovers in my dipping bowl with a spoon. 

While the broth is reducing begin heating up the vegetable oil.


Use a heavy, large skillet or pot to deep fry the tacos.  I have a deep fat fryer but I also use my cast iron chicken fryer.  It's nice and deep to easily hold the 2 inches of oil that's required. I'm addicted to cast iron.


The recipe makes 12 tacos.   These are a little rough looking, but who cares.


Crispy Chicken Tacos with Tomato Broth
Adapted from Here

 For the Tacos
Ingredients:
1 Tbsp olive oil
1/2 medium sweet onion
2 garlic cloves
2 Jalapeños or preferred spicy chiles
1 tsp cumin
3/4 pound tomatoes (2 medium-sized)
1 pound chicken tenders (or shrimp)
3 to 4 Tbsp fresh cilantro
salt to taste
12 thin corn tortillas
vegetable oil for frying (enough to have a depth of 2" in your pan)

Mise en place:
  • chop onion into 1/4" dice
  • finely dice garlic cloves
  • seed, de-vein and finely dice jalapeños
  • cut chicken into 1/2" pieces (if using shrimp peel, de-vein and cut into 1/2" pieces)
  • chop tomatoes into 1/4" dice or run through grating disc on food processor
  • roughly chop cilantro
  • fill deep frying pan with 2" oil
  • Have a jelly roll pan ready to use for the softened tortillas, a plate to hold the rolled tacos and a plate covered with paper towels for draining the fried tacos.
Method:
In a large sauté pan, heat olive oil over medium heat.  Add onion and cook, stirring occasionally, until translucent, around 3-4 minutes.  Add garlic, chilies, and cumin and cook for another minute.  Add the chicken (see note below if using shrimp) & tomatoes and cook, stirring occasionally, until the filling reduces to a thick sauce.  Remove from heat and allow to cool.  Stir in cilantro and season with salt to taste.

(if using shrimp, add after the mixture has thickened and cook for only one minute before removing filling from heat).

Heat the oil to about 350 - 375°.  Grab two tortillas at a time with a pair of tongs, dip them for a few seconds in the oil to soften them.  Pat dry with paper towles and pile them into a single stack (I use a jelly roll pan for this).  With all tortillas softened, move to one side of the jelly roll pan and use the other end for your rolling surface.  Have a platter ready to set the rolled tacos on.  Spoon about 2 Tbsp of filling across the bottom of a tortilla, roll tightly and secure with toothpicks.  Place on platter.  When all tortillas are rolled you're ready for frying.

Fry the tacos in the hot oil for about 1-1/2 minutes, then turn over and fry until golden.  Drain on paper towels and serve immediatley with tomato broth.


For the Broth
Ingredients:
3/4 pound ripe tomatoes
1/2 medium sweet onion
2 cloves garlic
1 Tbsp olive oil
2 cups chicken or shrimp broth
salt to taste

Mise en Place:
  • roughly chop tomatoes
  • roughly chop onion
  • peel and roughly chop garlic
  • meausure out broth
Method:
Place the prepped tomatoes, onion & garlic in a blender and pureé until smooth.

Heat the olive oil in a medium saucepan.  When the oil is hot enough to sizzle a drop of the pureé, cook and stir until noticeably thicker and darker, around 5 minutes.  Add the broth, bring to a boil and simmer on medium-low heat for 30 minutes.  It should be somewhat runny.  Season to taste.

I'm sharing this recipe at IHCC.  Go see what everyone else made this week!

Sunday, April 29, 2012

Mexican Scalloped Potatoes

Selecting potatoes as my featured ingredient was an easy choice for "From the Earth" week at I Heart Cooking Clubs.  The things grow in the dirt right?  Rick Bayless's Mexican Kitchen offered this recipe hidden within the pages of a recipe for Salsa Verde, which was an integral part of the potato recipe.

To help make dinner preparation a little quicker during the week, I made the salsa verde one evening after work.  With the salsa verde prepared the potatoes were easy to throw together for a weeknight meal. 


We started with new potatoes, salsa verde, cheese, & cream


After scrubbing and slicing, the potatoes received a toss of salt then half were placed in the baking dish.  The potatoes were topped with half the salsa verde, half the cream and half the cheese. 


You repeat the second layer with all of the ingredients in the same manner as the first.  Looks kind of grody doesn't it?  The salsa verde may not look appetizing but it's flavor holds a punch of citrus and zing that flavors these potatoes like nothing I've tasted.


After pouring the rest of the cream over the potatoes it may seem like there is a lot of liquid but it cooks down to a thick, rich and creamy sauce.


Baked for 30 to 35 minutes in a 400°F. oven the salsa verde, cream and cheese melded together to create a smoky, citrus-y tang of a sauce.


They paired up well with grilled butterflied pork chops.

Notes & Thoughts: 
These potatoes were very tasty and were a big hit with Lovey.
I did not use the chiles in the salsa verde, because Lovey won't eat anything with the spicy heat.  You'll also note that my baking dish was not 13" x 9" because I (as I often do) halved this recipe.  The recipe below is for a full recipe.

Mexican Scalloped Potatoes
Adapted from Rick Bayless's Mexican Kitchen

Ingredients:
3 pounds boiling potatoes I used red new potatoes
one recipe Salsa Verde (recipe below)
1-1/2 cups heavy whipping cream
1-1/2 cups shredded Chihuahua or other melting cheese

Mise en Place:
  • scrub potatoes and dry
  • grate cheese
  • measure cream
Method:
Preheat oven to 400°F.  Slice potatoes into a large bowl and toss with salt.  Layer half of the potatoes in the bottom of a 13 x 9-inch baking dish.  Spread half of the salsa verde (about 3/4 cup) over the potatoes.  Pour half of the cream (3/4 cup) over the potatoes and sprinkle half the cheese.  Repeat with the remaining potatoes, sauce, cream and cheese.  Bake for 30-35 minutes until browned and the potatoes are tender.


Salsa Verde Cocida
Ingredients:
1 pound (10 - 12 medium) tomatillos
Fresh serrano chiles to taste (roughly 3, 1/2 ounce total)
1-1/2 Tbsp olive or vegetable oil or rich-tasting lard, divided no thank you on the lard
1 medium (6 ounce) white onion
2 large garlic cloves
2 cups chicken, beef or fish broth (depending on how the sauce is to be used) I used beef
1/3 cup cilantro
salt, 1/2 to 3/4 tsp, depending on the saltiness of the broth

Mise en place:
  • husk and rinse tomatillos
  • stem the chiles
  • peel and roughly chop the onion
  • peel and roughly chop the garlic
  • wash and roughly chop the cilantro
  • measure out your broth
Method:
You can roast the tomatillos and chiles, or boil them.  I chose to roast.
Lay the tomatillos and chiles on a baking sheet and place about 4 inches below a very hot broiler.  When the tomatillos and chiles blister, blacken and soften on one side, about 5 minutes, turn them over and roast the other side.  Transfer tomatillos., chiles, and any accumulated juices to a food processor or blender.

Heat 1 Tbsp of the oil in a deep, medium-large (9- or 10-inch) heavy skillet over medium heat.  Add the onion and cook, stirring often, until deep golden, about 8 minutes.  Stir in the garlic and cook a minute longer, then scrape the browned mixture into the processor or blender.  If using a blender, cover it loosely.  Now, pulse whatever machine you're using to reduce the ingredients to a rough-looking puree -- smooth enough to hold together, but rough enough to keep it from that uninteresting baby-food blahness.

Wipe the skillet clean, then heat the remaining 1/2 Tbsp of the oil over medium-high.  When hot enough to make a drop of the puree sizzle sharply, pour it in all at once and stir constantly for 4 to 5 minutes, as your sauce base sears and sizzles into a darker and thicker mass.  Stir in the broth, let return to a boil, reduce the heat to medium and simmer briskly until thick enough to coat a spoon, about 10 minutes.  (You can check the consistency by spooning a little on a plate:  If it looks watery, solids separating quickly from the broth, simmer it longer; if it mounds thickly, stir in a little broth or water.)  Stir in cilantro, then taste and season with salt.

You can prepare this sauce 4 to 5 days ahead.  If frozen, whiz it in the blender or processor to get it back to a beautiful texture.

As Rick points out in his book, this sauce can be used for so many dishes whether it be fish or enchiladas.

I'm sharing this recipa at IHCC.  Wander over and check out everyone else's recipe choices for the week.

Monday, April 16, 2012

Asparagus Mornay

Nothing cries out 'Spring is here!' more than a big bundle of fresh asparagus.  Lovey and I were recipients recently of a huge bundle of freshly picked asparagus from our neighbor's garden.  I guess I should clarify that we did not nick the asparagus from our neighbor's garden.
It was enough to enjoy for two nights.  With half of our bounty I made Garlic Asparagus, which is our go-to twice a month way to eat our favorite green vegetable.


I treat fresh asparagus the same way I would a bouquet of flowers.  I cut a thin slice, on the bias, off the bottom of each stalk and place them in a size-appropriate container that has about an inch of water in it.  You can use a pretty vase or a jar, and if you're really classy like me you can put them in this plastic margarita mug that was purchased at a 2005 Summer Mummer's performance; it's the perfect size.  Store it in the refrigerator until you are ready to use.

To use the rest of the asparagus I looked through my daunting box of recipe clippings and found a recipe from the May 1997 issue of Southern Living.  The recipe was submitted by Ellie Wells from Lakeland, Florida.

When you are ready to prepare the asparagus hold the tip in one hand and the base in the other.  With the hand that is holding the base, gently push the spear away from you and it will snap naturally where the spear begins to get tough.  Spears that are nice and thin really don't need this treatment.  You can also, at your discretion, peel the fat spears 3/4  of the way up the spear.

Get the ingredients for the mornay sauce ready to go.  You have butter, flour, half-and-half, ground nutmeg, salt, bouillon, and Swiss cheese


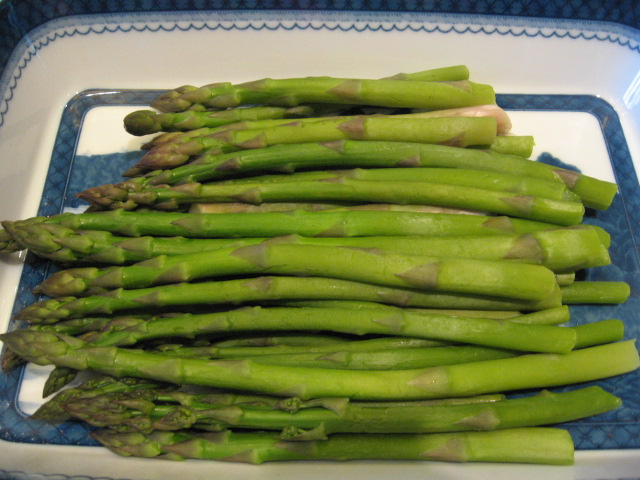
Now for the asparagus.  Ellie prefers to boil her asparagus covered in water for about 8 to 10 minutes.  I prefer to steam mine and it doesn't take that much time for it to reach the crisp-tender that you will want for this recipe.


When the asparagus is crisp-tender, place it in a lightly greased 11" x 7" pan.


Begin your sauce, as so many sauces are, by melting the butter and adding the flour to make a roux.


Whisk until smooth and continue whisking as the roux cooks for about a minute.  This will alleviate a floury taste.


Slowly add the bouillon, half-and-half, nutmeg and salt.  Continue cooking this over medium heat whisking constantly, until thickened and bubbly.


Remove your saucepan from the heat and stir in the cheese until melted.


Pour the mornay sauce over the asparagus and top with the cracker crumbs.

Place under the broiler until lightly browned. 

Okay, here's the deal.  I have been wrestling whether to show you the finished product or not.  My first inclination was, "No way".  I'm so embarrassed to show you how stupid I was.  On the other hand I'm only human and we all screw up in the kitchen don't we?  It wasn't like I was making this for company.


While the asparagus was under the broiler I made the mistake of going over to the sink to work on cleaning up this mess.

Before I knew it, this is what my beautiful dish looked like.


Heaven knows this is why I would never want to be a contestant on 'The Next Food Network Star'.  I would be brow beaten and brought to my knees in tears.

Believe it or not, the over-browning did not hurt the flavor of this dish whatsoever.  I'm still in denial - it's b-u-r-n-t, okay?  A little advice... stand in front of your oven and keep an eye on food that is being broiled.

I was really pleased with this recipe and it will grace our table again.

Asparagus Mornay
Yield:  4 servings

Ingredients:
1-1/2 pounds fresh asparagus
1/2 tsp chicken bouillon granules
2 Tbsp hot water
1 Tbsp butter
1 Tbsp all-purpose flour
1 cup half-and-half
1/8 tsp ground nutmeg
1/8 tsp salt
1/2 cup (2 ounces) shredded Swiss cheese
2 round buttery crackers

Mise en Place
  • Snap off touch ends of asparagus and rinse the asparagus in cold water.
  • dissolve chicken bouillon granules in the hot water
  • measure out butter, flour, half-and-half, nutmeg and salt
  • shred cheese
  • crumble up crackers in small baggie
Method:
Lightly grease and 11" x 7" casserole and set aside.  Steam asparagus until crisp-tender (about 5 - 8 minutes).  Drain and pat dry with paper towels.  Arrange the asparagus in the bottom of the prepared casserole.

Melt butter in a small saucepan over low heat.  Whisk in flour until smooth.  cook, whisking constantly, 1 minute.  Gradually whisk in the bouillon, half-and-half, nutmeg, and salt; cook over medium heat, whisking constantly, until thickened and bubbly.  Remove from heat; stir in cheese until melted.  Pour mixture over asparagus; sprinkle with cracker crumbs.

Broil 6 inches from heat for 3 - 5 minutes or until lightly browned.

Source:  Southern Living ~ May 1997

Sunday, April 15, 2012

Mango-Lime Ice

When you have luscious fruits like these, and add a little sugar you know it's got to be something good.  Mango-Lime Ice is my choice for Sweet Tooth week at I Heart Cooking Clubs

Rick Bayless' cookbooks don't just throw recipes on a page.  He teaches you a little something that you might not otherwise know about a particular food in the Mexican culture.  For this recipe he explains that tropical fruit ices and fruit popsicles called paletas are a way of life in Mexico.  That shouldn't surprise anyone with all of the different tropical fruits they have at their disposal.


Measure out your sugar, peel your orange,  peel the mangoes, and juice your limes.  Oh, and measure out a cup of water, which I totally left out of the photo.


When peeling the orange, make sure you only take the thin orange part.  You don't want any of the white pith which will make it bitter.


See this little piece?  Too much white on it.  Finely chop the zest.


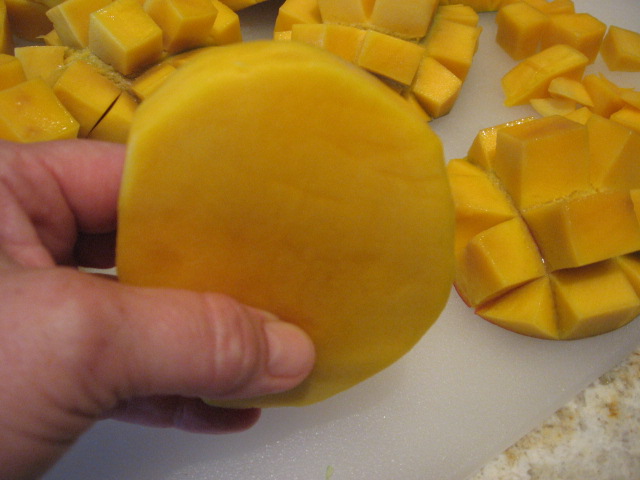
Mangoes have this large flat, oval pit which makes it a little tricky to cut up.

I stick my knife tip into the fruit to get an idea of how fat the seed is.  Propping the mango on end, cut down one wide side then repeat down the other side.


I then take my knife and cut in a tic-tac-toe grid on each half


Fold back the fruit and you have a little hedgehog.  Slice off each little section with a paring knife.


There can still be 'meat' around the pit.  You can trim off any substantial amount.  Or, you can do what I normally do and that is


stand over a sink and eat around it.  Mmmm...one of life's little pleasures; a treat for the cook.


Throw the mangoes, lime juice, orange zest, sugar, & water into a food processor and process until smooth.


Push the mixture through a fine sieve then pour into a 9 x 9 inch pan and place in the freezer for 2 hours.


See these solids that were left?  I ate them as a snack.  It was very orange-y and tangy and sweet.  Another treat for the cook.


When the mixture is firm 2 inches in from the edges, whip with an immersion blender.  You can also scrape it back into the food processor as well; your choice.  Place back in freezer.  Perform this ritual 2 more times then freeze for 1 hour before serving.

As I was enjoying this treat, I began dreaming of all the wonderful ways to use this tropical concoction.  Most of them included alcohol; like mixing with champagne.  But, it's hard to beat the pure pleasure of eating it just the way it is.


Mango-Lime Ice (Nieve de Mango con Limón)
Serves 6 to 8
From Rick Bayless's Mexican Kitchen


Ingredients:
4 large (2-1/4 pound total) mangoes, peeled, fruit cut away from the pit (about 2 heaping cups)
Rind of 1 orange (colored zest only)
1-1/4 cups sugar
1/3 cup fresh lime juice
1 cup water

Mise en place:
  • measure your sugar
  • measure your water
  • juice your limes
  • peel rind from orange and chop fine
  • cut fruit away from the pit on your mangoes & coarsely chop
Method:
In a food processor, combine the mangoes, orange zest, sugar, lime juice and 1 cup of water.  Process to a smooth puree, then press through a strainer into a stainless steel bowl or 9 x 9 inch pan.  Freeze until the mixture is firm 2 inches in from the sides, about 2 hours.  Whip with an immersion blender or scrape into a food processor and process until slush.  Repeat the freezing and beating 2 more times, then freeze at least 1 hour before serving.

Rick suggests that it is best to eat the ice within a day, because it will become progressively more icy.  If the finished ice has been in the freezer for several hours, soften it in the refrigerator for half an hour before serving.

I'm sharing this recipe at IHCC

Friday, April 13, 2012

An Abundance of Herbs


Sometimes I end up with herbs that will go to waste if I don't use them.  Sometimes the herbs on my patio are growing like wildfire so I'm blessed with an abundance.  Sometimes a recipe will call for a fresh herb that I don't grow so I rely on the fresh herbs at the market where you have no choice but to buy a large bundle of the herb.

When I find myself in this position, I freeze the herbs into ice cubes.


Recently I had an abundance of rosemary.  I stripped the leaves from the stems.  if you like, you can chop the herbs instead of leaving them whole as I've done.


Fill the compartments of an ice cube tray with the herb


Gently fill each compartment with water.   Place the ice tray in the freezer and freeze until rock hard solid.


Pop them out of the ice tray and store them in a freezer bag.  They are great to use when you need herbs for soups and stews; just toss a couple into the pot!

Sunday, April 8, 2012

Seared Fish Fillets in Escabeche

"Es-cah-BAY-Chay".  A marinade-type preparation that is brothy and much like a vinaigrette that proved to be an incredibly fresh dish for a spring evening.  Adapted from Rick Bayless' recipe in his book Mexico - One Plate at a Time this is my selection for this week's "Bienvenido Rick!" at I Heart Cooking Clubs

Rick's book this recipe is taken from is the companion book to the PBS Series with the same name.  That series was how I was introduced to Rick Bayless.  I'm looking forward to exploring his cookbooks over the next 6 months.


Ingredients for the escabeche


Rick prefers a snapper or halibut for this recipe but I had cod in my refrigerator that I needed to use and it worked just great.  The fish is simply seared in hot olive oil until browned on both sides.


The primary prep work is cutting up your vegetables and getting everything at hand, ready to add to the skillet to create the marinade that is going to give your fish fabulous flavor.


 If you slice your onions from pole to pole you'll find they don't end up in a big wad once they are caramelized.


Here we are all lined up to go!  We have our veggies diced up in the bowl, the vinegar, broth (I used fish broth) and the herbs and spices.  The ingredient I omitted (which is probably what makes this recipe what it is) are the pickled jalapeños.  Lovey just can't handle the heat.


After the fish has been browned and set aside, saute the onions, carrots and garlic over a reduced heat.  Once they are soft, the rest of the ingredients are added and simmered so the all the flavors come together.


When I plated the dish up, I placed a little bit of the escabeche on the plate, topped with the fish and spooned a little juice then topped with more of the vegetables.

The flavors in this dish that made my mouth sing were what the vinegar added and that little hint of the cinnamon.  I would love to try this again and add those jalapeños!

Filetes de Pescado en Escabeche - Seared Fish Fillets in Escabeche
Adapted from Mexico One Plate at a Time - by Rick Bayless
Serves 6

Ingredients:
1/2 cup extra virgin olive oil
six 5 to 6 ounce boneless, skinless fish fillets, about 1/4 inch thick
2 medium white onions
3 medium carrots
6 garlic cloves
3 bay leaves
leaves from 6 sprigs of fresh thyme (or 1/2 tsp dried)
leaves from 6 springs of fresh marjoram (or 1/2 tsp dried)
3 whole cloves
1/4 tsp black pepper, preferable freshly ground
a 2-inch piece of cinnamon stick, preferably Mexican canela
1/4 cup cider vinegar
1 cup water or light fish or chicken broth
salt
3-4 large fresh or pickled jalapeño chiles

Mise en place:
  • peel onion and slice 1/4" thick
  • peel carrots and cut into 1/4" dice
  • peel garlic cloves and quarter
  • if using fresh herbs, strip leaves from stems of thyme and marjoram and lightly chop
  • if using fresh jalapeños, stem, seed and cut lengthwise into thin strips
  • set aside bay leaves, cloves, and black pepper in small ingredient dish
  • measure out vinegar and broth
  • measure out olive oil into skillet
Method:
In a large (12 inch) heavy skillet) preferable well-seasoned cast iron or nonstick), heat the olive oil over medium-high heat.  Pat the fish fillets dry with paper towels, then lay them in a single uncrowded layer in the hot oil (you may need to do this in batches, depending on the size of your pan and the fillets).  Brown richly on one side, 3 to 4 minutes, then flip the fillets over and brown the other side, letting the fish cook until it flakes under firm pressure, 2 to 3 minutes more.  Remove the fillets to a plate and set aside.

Reduce the heat under the pan to medium and add the onions, carrots and garlic.  Stir regularly until the onions are translucent and the carrots almost soft, about 5 minutes.  Add the bay leaves, thyme, marjoram, cloves, black pepper, cinnamon, vinegar and water or broth.  Cover and simmer over medium-low heat for 15 minutes to bring the flavors together.  Taste and season with salt, usually about 3/4 teaspoon, then stir in the jalapeno strips.

If you want to serve the dish warm, simply lay the fillets over the simmering escabeche, cover and gently heat for 4 to 5 minutes.  It's easiest to serve the warm dish by placing a piece of fish on each of six dinner plates, then spooning a portion of the brothy escabeche over each one, arranging sprigs of herbs decoratively on top.  To serve the dish cool, simply arrange the fish on a deep serving platter and spoon the escabeche over it all.  As it cools, the fish and vegetables will absorb much of the liquid, making this an ideal warm-weather main dish.


I am sharing this recipe at IHCC

Tuesday, April 3, 2012

Strawberry-Limeade Iced Tea

When our weather turns hot in Texas a cold glass of anything is pure heaven.  This flavored tea is part of April's Southern Living's spread on Strawberry Delights.

The base recipe is for Strawberry Limeade which is great all by itself.  You can add a little spritzer water to zing it up a bit.

For the iced tea version, you simply substitute fresh brewed tea for the iced water.


The strawberry limeade mixture doesn't lend itself as a sweetener for the tea, just flavors it nicely.  Between the two, I would stay with the base recipe and leave out the tea.  The strawberry and lime flavors are more prominent and the coloring is much prettier without the tea giving it a murky look.


Strawberry Limeade Iced Tea
Makes 7 cups

Ingredients:
3 cups sliced fresh strawberries
1 cup sugar
4 cups freshly brewed tea, chilled
2/3 cup fresh lime juice (about 4 large limes)

Mise en place:
  • brew tea and set aside to cool, then chill in refrigerator
  • wash, core and slice strawberries into large mixing bowl
  • measure out sugar
  • juice limes
Method:
Stir together the strawberries and sugar in a large bowl; crush strawberries with a wooden spoon, and let stand at room temperature 30 minutes.

Process strawberry mixture in a blender or food processor until smooth, stopping to scrape down sides as needed.

Press mixture through a wire-mesh strainer into a large pitcher; using the back of the spoon to squeeze out juice; discard solids. 

Add cold tea and lime juice, stirring until blended.  Cover and chill 2 to 4 hours.
For Strawberry Limeade, use 4 cups cold water instead of tea.