Showing posts with label sandwich. Show all posts

Monday, March 13, 2017

Turkey Burgers


I've tried recipe after recipe for turkey burgers and they always seem to end up blahhhhh. No flavor and they usually have the taste and texture of cardboard. I eat a lot of cardboard so I know how that tastes I found this recipe from Martha Stewart and it's actually pretty good and Lovey liked it; which is what really matters in this house if I'm making a burger out of turkey instead of beef.


There aren't a lot of ingredients; but the few that there are pack a punch of flavor.


Fresh sage.

 
Roasted garlic. This can be done earlier in the day or the day before. Here's how I do it.

 
 Provolone cheese.


 And, of course, ground turkey.  I prefer a mixture of white and dark.


Just mix it all up.

 
Divide the mixture into four portions and form into patties. Conveniently, these can be made early in the day or even the day before.

 
 I threw them on a medium-high grill for about 3-4 minutes per side.


NOTE:  I doctored my first burger up like I do a beef hamburger with onion, tomato, lettuce and kosher pickle.  Although good, it really masked the flavors that this burger has.  I prefer with minimal condiments because the meat is flavored really nice with the sage and garlic.  The original recipe suggested using a simple tomato pureĆ© spread on it.

ALSO:  Although char-grilled flavor can't be beat on a burger, I prefer these cooked in a cast iron skillet. The garlic, sage, and cheese flavors are much more prevalent.


Turkey Burgers
Yields 4 burgers

Ingredients:
1-1/2 pounds ground turkey - mixture of breast and dark-meat turkey
1/4 cup roasted garlic
2-1/2 tsp. finely chopped fresh sage
1-1/4 cups grated provolone cheese - about 5 ounces
1/2 tsp. each Kosher salt and freshly ground pepper
4 hamburger buns
vegetable oil
melted butter

Mise en Place:
  • roast garlic
  • chop sage
  • grate cheese
Method:
In a medium-sized mixing bowl, gently combine with your hands the turkey, garlic, sage, cheese, salt and pepper.  Do not overwork the meat.  Shape into four patties.  Refrigerate, covered, until cold, about 1 hour or overnight.

Preheat grill to medium-high (if you are using a charcoal grill, coals are ready when you can hold your hand 5 inches above the grill for just 3 to 4 seconds). Brush grill and burgers with vegetable oil. Grill, flipping once, until cooked through, 3 to 4 minutes per side. Alternately, you can prepare inside using a cast iron skillet.

Brush both sides of buns with melted butter and place on grill until lightly toasted.

Serve with crispy oven fries.


Thursday, April 25, 2013

Yes, You Can Eat Well at the Sea Shore

This past weekend I spent about four and a half days with my bestest friend down in Corpus.  She and her husband have retired there and have re-built his family home into a very nice house that fits them to a tee.  But we didn't stick around her house all the time.

Sunday, PR let us take his four wheel drive Ford King Ranch Edition Crew Cab pick-up out on the Padre Island National Seashore.  That is one nice and B-I-G truck!

If you drive about 10 more miles down the road once you've gotten on the island you reach the gate for the National Seashore.  It's quiet, people are few and far between and if you have the time you can drive 60 miles down the island on the beach; but at 15 miles per hour it would take you about 4 hours.  You pay $10 per car or $20 for an annual pass.  Being the mathematical geniuses Karen and I are we purchased the annual pass for Karen since she can visit every day if she wants to.

We drove the truck down the beach until we found an isolated spot.  We set up camp, so to speak.  We laid a blanket down on the sand, folded out our comfy chairs and set the ice chest in between them as a 'coffee table'.  We also had some really nice roll-out pads with pillows that Karen's friend Brenda bought to use when we wanted to lie down and stretch out; thanks Brenda!  They worked out really nice!

After a nice long walk down the beach, looking for the nesting turtles (of which we found none) we relaxed at our campsite with an adult beverage and a book to read. 

Alas, we did get a bit hungry and this is what we brought to make for our lunch.  A sandwich; but not any old sandwich. 

 
 This sandwhich started with a very nice whole wheat bun sliced in half

The night before we made a batch of pesto with Karen's overflowing basil plant that grows in her potager.  We used that pesto as our base for the sandwich.


Topped that with some sliced avocado and seasoned with a little sea salt


 Laced it with slices of Brie


 Roma tomato with an additional sprinkling of salt


 And topped it off with some Romaine lettuce.


Proof that you can eat well at the beach when you aren't in the mood for hamburgers and hotdogs.


Friday, August 10, 2012

Ribbon Party Loaves

If you are looking for a chilled, Summery sandwich to serve for your bridge club, book club  or afternoon tea, you might want to try your hand at these.  By 'these' I mean Ribbon Party Loaves.  They are like an iced layer cake except savory.

Bread instead of cake; savory fillings and a cream cheese icing instead of buttercream.

I first told you about these here.  I know, I know, I said I'd show these to you in the "near" future.  It took me several months, but here we are.


I became very nervous about making these.  It's been decades since I've made them.  We used to make around six a day.  And let me tell ya, Tyra and I could whip these babies out in a snap.


Prepare all of the fillings that you will be using.  You will have two fillings per loaf.  Some of the combinations we made in the tea room were chicken salad/egg salad, chicken salad/ham salad, and ham salad/pimiento cheese.

You can use your favorite recipes for your fillings.  I make mine very simple.  The egg salad is made with Hellman's and celery salt.  The chicken salad has diced celery in it and the ham salad has sweet pickle relish and hard boiled egg in it.  For the pimiento cheese, I purchase that.  Prices brand seems to work best for me.

The consistency of the fillings should not be runny; you don't want them glopping out the sides of your loaf.  Refrigerate them until it's time to assemble the loaf.


You can prepare your own white bread recipe or purchase an unsliced loaf at your local bakery.  This recipe makes a good loaf for this sandwhich.  Use a serrated knife to slice off the crust from all surfaces of the loaf. 


When you slice the loaf horizontally, make them between 1/2-inch to 3/4-inch thick.  You can use the domed top of the loaf as the top of one of your sandwiches.  I wanted my loaves to have a flat top so I saved the dome to make bread crumbs.  You'll need three slices per loaf.  Depending upon the height of your loaf you may get four.

These tips on slicing the bread will be helpful:
  • have two tea towels ready, one to place the slices on and one to keep them covered
  • as you make your horizontal slices, be sure to stack them on the tea towel in the same order as they came from the loaf (bottom on bottom, etc.)
  • if you are only making one loaf, freeze any extra slices you end up with; you need three slices out of the loaf
  • When you trim the crust from the loaf try to trim it as thin as possible.  You don't want a lot of crust left on the bread but you don't want to cut off too much of your bread either.
  • Some loaf pans will produce a loaf with sides that slant slightly.  When you trip off the crust, straighten those out as much as you can so the sides are more perpendicular than slanted.


I assembled both of my loaves on a large cutting board.  You can also use a jelly roll pan turned upside down.  If you are making more than one loaf and assembling them on the same board/pan,  make sure you have enough room between the loaves to ice them comfortably.  I could have given myself a little more room between two I made on this board.


 For this loaf I placed one slice of bread for the bottom and topped it with chicken salad.  In this case I put the chicken salad as the bottom layer because it was the heavier of the two fillings.  Make the thickness of the filling layers as close to the same thickness as the bread layers. As a general rule, you will use 1-1/2 to 2 cups of each filling. If you purchase the 12 ounce container of Pimiento Cheese you will probably use all of it.

Place the middle layer of bread on top of the bottom filling and spread your second filling on top of it; in this case it is the egg salad.  Finally, top with the top layer of bread.   With a small rubber spatula, gently go around the sides of the loaf the "pat" the fillings in if they are oozing out a bit.  This will also tidy up your loaf. You can also accomplish this by wearing powder-free medical gloves and patting it all in with your hands.

Cover the loaf with a tea towel as you assemble another loaf and/or make your cream cheese icing.


Here is my second loaf of ham salad and pimiento cheese.


The "icing" is very simple.  To make sure I have enough, I use about 12 ounces of softened cream cheese per loaf.

Whip the cream cheese until smooth then add milk, one teaspoon at a time until you have a nice spreading consistency.


The only seasoning I use is this.  Use sparingly and taste so you don't get it too salty.


Sorry I don't have any photos of the loaves being iced.  But it's not rocket science.  Do it just as you would a layer cake; sides first then the top.  You want the bread and fillings completely covered.


Sprinkle the tops with a little dried or fresh parsley.  If using fresh, be sure to have it completely dry.  Place the loaves in the refrigerator for several hours to firm-up the cream cheese.  Once the cream cheese is firm you can lightly drape a tea towel over the loaves until serving.

When ready to serve, use a serrated knife and use a gentle sawing motion to slice.  Don't slice by pressing down.

You can transfer the loaves to a serving platter if you like once they are firmed up.  Be sure to use a heavy-duty long spatula that will hold up to the weight.

Place your slice on a plate and serve with a small tossed salad or a cup of soup.


Ribbon Party Loaf
(These instructions are for 1 loaf)
Serves 6 to 8, depending on the length of the loaf

Ingredients:
1 loaf homemade or bakery-made white bread, unsliced (not commercial sandwich bread)

approximately 1-1/2 to 2 cups each of two different fillings (chicken salad, egg salad, ham salad, pimiento cheese, etc.)
12 ounces cream cheese
milk, a teaspoon at a time
Lawry’s garlic salt, to taste
Dried or fresh parsley

Mise en place:
  • set cream cheese out to soften
  • prepare your fillings, cover and refrigerate until ready to assemble
  • trim all the crust from the loaf of bread
  • slice the loaf of bread horizontally (1/2 to 3/4-inch thick) and place on tea towel then keep covered with another tea towel
Method:
Assemble sandwich loaf:  (I'm going to give instructions for a chicken salad / egg salad loaf)

Place the bottom slice of bread on a chopping board or an overturned jellyroll pan.  Spread the chicken salad on the bread slice using a small rubber spatula to smooth the top and sides.  Try to make the layer of chicken salad as close to the thickness of the bread as possible.

Gently lay the middle slice of bread on top of the chicken salad.  Press just enough to make it firmly sit on the chicken salad, but not so much that the chicken salad starts spreading over the sides.  Spread the egg salad on the bread slice, smoothing as you did the chicken salad layer.

Gently lay the top layer of bread on the egg salad.  Press just enough to make it firmly sit on the egg salad, but not so much that the egg salad starts spreading over the sides.

With a small spatula, work around the loaf and press any fillings in so that the fillings and even with the edges of the bread.

Make Cream Cheese Icing:

In mixing bowl, using a stand mixer or hand mixer, whip the cream cheese until it is nice and smooth.  Add 1 tsp of milk and whip.  Add more milk, a tsp at a time, until your cream cheese is a nice spreading consistency.  Sprinkle with garlic salt, to taste, and mix in well.

Icing the Loaf:

Apply about 1/4-inch thickness of the icing.  You want to create a stable "case" for the loaf.  Using a palette knife (frosting spatula), apply cream cheese icing to the sides of the loaf.  Work each side from bottom to top and keep the loaf steady by placing your left hand on the top of the loaf as you spread the icing.  Spread icing on the top of the loaf as you would a cake.  Sprinkle parsley on top.

Place the loaf in the refrigerator for several hours to firm up.  Once the cream cheese has firmed a bit, you can lightly drape a tea towel over the loaf.

To Serve:

Use a large, serrated knife and slice using a back and forth sawing motion.

Wednesday, March 21, 2012

Classic White Bread


In the late seventies, my friend Tyra and I left the flatirons of Boulder, Colorado for the desert of West Texas.  There was an oil boom going on and we decided to get a little slice of it.  We traded the mountains for the flat, bare, dry, windy and dusty plains of the Permian Basin and experienced geographical and cultural shock.  Doesn't sound like a fair trade, but the experience we gained from it was worth it and I grew to appreciate it in many ways.

We opened a Tea Room in Midland, Texas which was actually a second location, as Tyra's mother owned the original in San Antonio.  We were just young ladies who didn't know what we were doing at the time, but we learned really quick.

Tyra's mother Helen taught us a thing or two; and one of those things was a Ribbon Party Loaf.  Classic ladies' luncheon fare, it is a loaf of white bread, crust removed and sliced horizontally in thirds.  The loaf was assembled with a base of white bread, layer of filling (chicken salad, egg salad, ham salad, pimiento cheese, et al), layer of white bread, an alternate filling and topped with the top layer of white bread.  All of this was encased in a spreadable cream cheese mixture then refrigerated for several hours or overnight.  Sliced up, it produced a striking and feminine sandwich on the plate.
 
Now that I have your curiosity all a-buzz, I'm sorry to tell you this post is all about the bread. This is what a Ribbon Party Loaf looks like.

I haven't made a Ribbon Party Loaf in 20 years and I want to make several this summer so my first order of business is to select a good, basic white bread recipe that won't fall apart, yet have a nice crumb and flavor.  The big test is how it will hold up with fillings and how it will slice.

All of that said, the clipping for today is a classic white bread recipe that I tore out of a King Arthur Flour catalogue many moons ago.


It's an easy bread to prepare by mixing all of the ingredients in the order they're given in the recipe (water, honey, yeast, salt, butter, flour and nonfat dry milk) and knead (with the dough hook or by hand - I did a little of both) until you have a nice smooth dough that is elastic.

Shape the dough into a ball and place in a lightly greased bowl - I used a large 8 cup measuring cup.  Cover with a tea towel and let it rise for 60 - 90 minutes until it is puffy.  It doesn't have to be doubled in size.


Gently deflate the dough.  Wow, my hands are getting old.  Oh wait, could that be because I'm getting old??


Shape it in a log 9" long


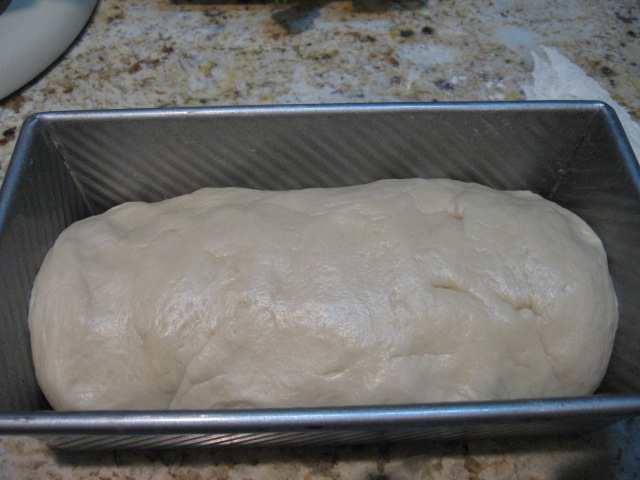
Place in a 9" x 5" lightly greased loaf pan.


Cover and let rise 60 - 90 minutes


until it's crowned 1" to 1-1/2" over the rim of the pan


Bake for 20 minutes.  The crown of this mass of dough is ripply; like my thighs; not really; I'll never tell.


Tent with foil and bake for another 15 to 20 minutes until golden brown or an instant-read thermometer reads between 195°F & 200°F.


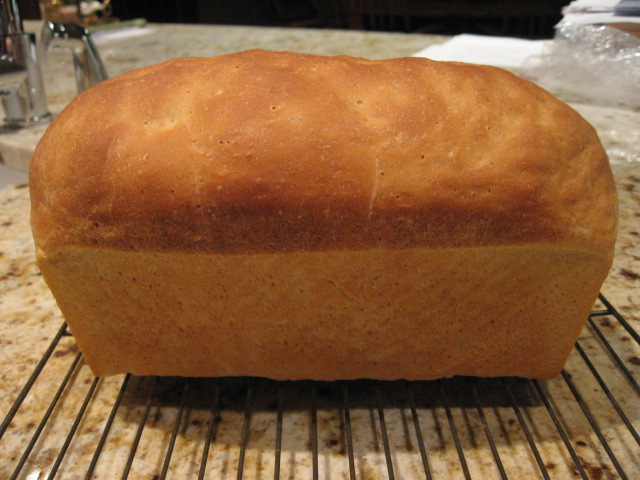
Turn out onto a rack and let completely cool.


For what it's worth:  I am please with this bread.  It smells great, tastes great (especially with slathered with soft butter) and has the texture I'm looking for.  A test on how it holds up with fillings will be the next step in deciding if this will be the bread to become a party loaf!
Classic White Bread
Yields 1 large loaf; about 18 servings

Ingredients:
1 cup + 2 Tbsp, to 1-1/4 cups lukewarm water*
1 heaping Tbsp honey
2-1/4 tsp instant yeast
1-3/4 tsp salt
2 Tbsp soft butter
4 cups King Arthur Unbleached All-Purpose Flour
1/3 cup Baker's Special Dry Milk or 1/2 cup nonfat dry milk granules
*  Use the lesser amount in summer or humid climates; the greater amount in winter or drier climates.
(I used the lesser amount because it is raining cats and dogs this evening)

Mise en Place:
  • measure out all ingredients and allow to come to room temperature
  • lightly grease a large bowl (I use Crisco)
  • lightly grease a 9" x 5" loaf pan
Method:
Mix all of the ingredients in the order listed, and mix and knead to make a smooth dough, one that feels bouncy and elastic under your hands.  Place the dough in a lightly greased bowl, or large (8-cup) measuring cup.  Cover it, and let it rise for 60 to 90 minutes, until it's become quite puffy, though not necessarily doubled in size.

Gently deflate the dough, and shape it into a fat 9" log.  Place it in a lightly greased 9" x 5" loaf pan.  Cover the pan, and let the dough rise for 60 to 90 minutes, until it's crowned 1" to 1-1/2" over the rim of the pan.  Towards the end of the rising time, preheat the oven to 350°F.

Bake the bread for 20 minutes.  Tent it lightly with aluminum foil, and bake for an additional 15 to 20 minutes, until it's golden brown.  An instant-read thermometer inserted into the center will read 195°F to 200°F.

Remove the bread from the oven, and turn it out onto a rack to cool.  When completely cool, wrap in plastic, and store at room temperature.

Tuesday, February 28, 2012

Lemony Chicken and Gravy Sandwich

I had roast chicken leftovers from last week.  I hate wasting anything.  I even saved the pan juices from the chicken since I didn't make gravy.  I got home from work the other night, tired & not too hungry.  Lovey was eating leftovers so I decided to make me a sandwich.

I grabbed the chicken and some leftover rosemary olive oil bread then started looking in the vegetable bin for things to add.  I found half an avocado that was, miraculously, still green and one piece of provolone.

I also eyed the little jar filled with the yummy pan juices from the chicken.  What made it even sweeter was any fat had solidified so I scraped it off and was left with a very nice broth.  I roasted the chicken with several Moroccan preserved lemons so the drippings boasted a heady lemony flavor.

I decided I would make the sandwich an open - faced one just so I could use this broth.

I cut a slice of the rosemary bread in half & toasted it.  Layered a generous amount of chicken thigh meat and avocado slices on each half and topped them off with the provolone.


Using a little bit of corn starch and the broth I made a gravy that was just thick enough to lazily run down the sides of the sandwich.  The heat of the gravy softened the cheese to perfection.

These were so delicious and light yet filling.  I could have stopped with one half; but I didn't; so I felt like a stuffed pup.  A little like this