Friday, August 2, 2013

Sherry Cake

There was once a little cake that people just couldn't get enough of; correction...they still can't get enough of.  With the super elegant taste that it has you would never believe it is such a simple cake to make.  And using a boxed mix no less.

During the late seventies when my dear friend Tyra and I owned a little tea room in Midland, Texas this cake was always in high demand.

Tyra's mother Helen passed the recipe on to us.  It was given to her by a young man who was in culinary school in San Antonio.  Over the decades I have run across a gazillion people who have this recipe or something similar.  A co-worker of mine brings the exact same cake to work except he uses rum.  I'm actually surprised that I don't see it more often.

Enough of the history lesson, it's simply the greatest cake you can make and take anywhere for any occasion.


Simple ingredients:  yellow cake mix, vanilla instant pudding, eggs, water, canola oil, and dry sherry. 

A word on a couple of the ingredients if I may. 
Cake Mix - buy the yellow butter recipe
Pudding - make sure it is instant; also, if you can't find regular vanilla, I have used French Vanilla. 
Sherry - please make sure it is d-r-y; you don't need  an expensive sherry but make sure it's dry; and never use cooking sherry!!
Eggs - I crack my eggs into a bowl before adding to a recipe.  Trust me, if you have ever cracked an egg into a recipe and it turned out to be rotten, you might not crack another egg in your life.


Pecans


This is why it's so easy...just dump everything but the nuts in the mixing bowl and mix.


 Begin by mixing on low for about 30 seconds to stir everything together


Now flip the switch to medium high and beat for about 2 minutes until the batter is soft and fluffy


Fold in the pecans


Prepare a Bundt pan by spraying well with vegetable spray and pour in the batter.


Here's what gives this cake it's 'wow factor'.  A sherry sauce made of sugar, butter and, what a surprise, dry sherry!


It's very important that the sauce be heated up slowly and boiled briskly for 2 minutes only.  Any time I've had trouble turning this cake out of the pan is when I did not let the sugar dissolve completely or I boiled the sauce for too long and it got to a soft ball stage and hardened too much while cooling in the pan.  The making of the sauce is timed so that it boils for two minutes prior to the cake coming out of the oven.  That's because the minute you take the cake out of the oven, you do this..


Pour the boiling sauce over the just-out-of-the-oven cake and watch it boil right into the cake.  The heat of the cake and the heat of the sauce just explode into bubbles.  See the wax paper under the cooling rack?  I put that there to catch any of the sauce that may boil over; just easier to clean up.


Oh my goodness, I wish you could scratch and sniff this photo; it is a-m-a-z-i-n-g.  Allow the cake to cool in the pan for thirty minutes so it can soak up all of that glorious sauce.


After the cooling time in the pan the cake will have soaked up all of that boozy, sugary sauce.


Turn the cake out on another cooling rack and allow it to cool completely.  Warning:  although the cake has been cooling in the pan for 30 minutes, the pan is still really hot.  So, take precautions when you turn it out of the pan.

Eat it warm, room temperature or cold; it will not disappoint.  Personally, I like it warm.  Cut a slice, pop it in the microwave for about 20 seconds and it will taste like it just came out of the oven.

This cake freezes well too.  I have successfully frozen it whole and as individually sliced pieces.


Sherry Cake
Serves 12

Ingredients:
For the Cake -

1 yellow butter recipe cake mix
1 3.4 ounce box vanilla instant pudding mix
4 eggs
1/2 cup water
1/2 cup vegetable oil
1/2 cup dry sherry
1 cup chopped pecans

For the Sauce -

1 stick salted butter (4 oz.)
1 cup granulated sugar
1/2 cup dry sherry

Mise en place:
  • empty cake mix and instant pudding into mixing bowl
  • measure out water, oil and sherry
  • break eggs into bowl
  • chop pecans
Method:

Pre-heat oven to 325 °F.  Add eggs, water, oil, and sherry to the dry ingredients that are in the mixing bowl.  Mix on low for 30 seconds until all ingredients are wet.  With spatula, sweep sides of bowl and mix ingredients on medium-high speed for 2 minutes.  Fold in pecans.

Spray Bundt pan with vegetable spray.  Pour cake batter into pan.  In a circular motion drag a knife through batter around the center of the pan to break any air bubbles and even out the batter.  Place on rack in middle of oven and bake for one hour.

Place a piece of wax paper on cabinet top and place a cooling rack on top of the wax paper. You want the wax paper there in case the sherry sauce over flows.

While cake is baking, prepare sauce.  In a small saucepan place butter, sugar and sherry.  Set a timer to 2 minutes but don't start it yet.  Begin melting and dissolving ingredients over low heat. 

Here is where you want to find your timing.  With my cook top I start dissolving the sauce over low heat when the cake has about 9 minutes left to cook.  With a small whisk, stir as ingredients are dissolving.  When sauce begins to boil turn on your pre-set timer and whisk constantly.  If it begins to overflow lift the saucepan off the fire until the foaming subsides then set it back on the fire.

When the timer for the cake goes off and the tester stick comes out clean, remove cake from oven and place on cooling rack.  Slowly begin to pour the sherry sauce over the top of the cake.  It will boil and bubble so try to distribute around the top of the cake evenly.

Allow cake to cool in pan for 30 minutes.  Turn cake out on another cooling rack to completely cool. 

Friday, July 26, 2013

Herb Savor Pods


You know what I love more than going to a kitchen store like Sur la Table or Williams-Sonoma and buying kitchen stuff?  Someone giving me kitchen stuff!!  And it is just icing on the cake when a certain gadget really works as it is designed and becomes a revered item in your kitchen
 
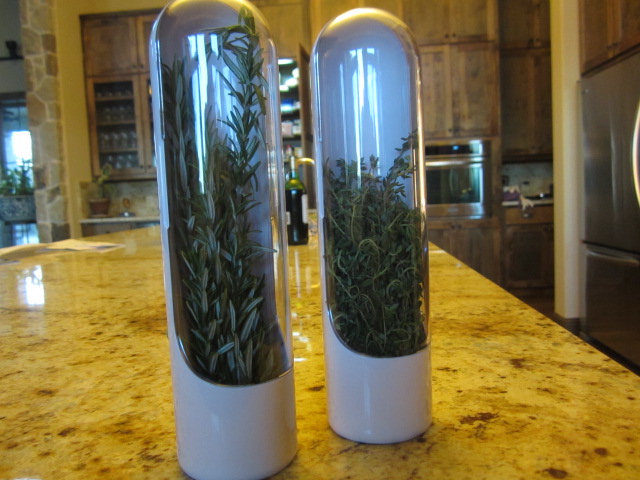
Char and Chris gave me these Herb Pods.  They are used perpetually and keep herbs fresh in my refrigerator 3 times longer than they would last under normal circumstances.  Normal circumstances meaning me being lazy and tossing them in the vegetable bin or plopping them in a vase like a flower.  Officially they are Prepara Herb Savor Pods. My set came with 3 pods.


These pods are a-m-a-z-i-n-g.  These herbs have now been in the refrigerator for 3 weeks....3 weeks!  They are as fresh as the day I bought them.

There is a white chamber that looks similar to what I would imagine a cryogenics chamber to look like.  Hmmmm...... it also looks a little like Woody Allen's Orgasmatron.  Name that movie.


Take time to trim the stems of your fresh herbs (as you would fresh flowers before you put them in a vase).  Place the herbs into the chamber then snap on the front clear face.  There is a hole at the back to add a little water and place the plug into it.  Simply place the pods in the refrigerator and you will have fresh herbs at your fingertips for weeks.

The herbs that I have had success with using this nifty little contraption are parsley, cilantro, rosemary, thyme, oregano, and tarragon.  Basil does not do well in the refrigerator period (in my experience).

The bundle of fresh herbs I buy at the market is usually way more than I'm needing.  In the past I had to dry or freeze the leftovers.  Thanks to this smart little device I can enjoy them fresh without much waste.


Thursday, June 27, 2013

Shrimp and Leek Quiche

It's hard to beat the creamy custard of a quiche.  Like an omelette, you can put practically anything in them and they will taste great.


Making it with fresh jumbo shrimp from the Gulf of Mexico makes it even better.  During a recent trip to Corpus my dearest friend Karen turned me on to her source for fresh seafood in Corpus.  Lorenzo Diaz, also known as The Shrimp Pimp, provides free delivery of the freshest brought-in-on-the-boat-that morning, seafood.  These 10-12 count shrimp were beautiful and only cost $7.50 per pound.  I brought plenty home with me.

That sounded like a paid advertisement.


The first order of business was to get the pie crust ready and in the pan.  I rolled the dough out for a 9" deep dish pie pan.  I then placed it in the refrigerator until I was ready to fill it.


I grated the Gruyere, chopped the leaks and prepared the shrimp by peeling, de-veining and cutting into bite-size pieces.  Lorenzo, the Shrimp Pimp was happy to pull the heads off for me.  Note:  If you are not traveling with your shrimp, take the heads!!!  You can make some great stock with them.


I sauteed the leeks in a little butter - olive oil mixture.


This is the olive oil I used.  Whenever possible, Lovey and I support products made in Texas.  Lovey picked this up at the Farmer's Market in Dallas.


As the leeks begin to soften, add the shrimp and toss quickly for one minute only.  You don't want the shrimp to cook through; just give them a little flavor.  Pull the leeks and shrimp off the heat and set aside to cool off a bit.


Preheat the oven to 375F°.  Sprinkle the cheese across the bottom of the pie shell.


 Beat your egg with the salt, a little cayenne to make it interesting and a light grating of nutmeg.


Heat the milk to the point that it has bubbles all around the edges of the pan.  Add a small amount of the hot milk to the bowl of beaten egg yolk and whisk them together.  Add small amounts of the hot milk a couple more times to temper the egg yolks, or get them warm so they won't curdle or scramble when you pour them into the milk mixture.


Stir the custard until it begins to thicken and coat the back of a spoon

Grate a little more nutmeg on top and give it a swirl.


Spread the leeks and shrimp on top of the cheese.


Gently pour the egg/milk mixture into the pie plate.  Top with the extra cheese.  Place in the middle of a preheated oven.


After baking in a 375° oven for about 30 minutes, or until the crust is golden, remove the quiche from the oven.

The advantage of making your quiche with the custard method (in lieu of pouring your cold egg/milk mixture over your fillings and popping it into the oven) is that you don't really have to let the quiche rest after it comes out of the oven.  It's ready to eat right then, hot and creamy.


Slice her up and enjoy!  I would suggest with a nice green tossed salad.


Quiche with Shrimp and Leeks
Adapted from a basic recipe for quiche in Bouquet de France - An Epicurean Tour of the French Provinces edited by Gourmet 1966.
Serves 8

Note that the ingredients below are for a deep dish pie.  If you wish to make this quiche in a regular 9" pie plate it is easily halved.

 Ingredients:
1 9-inch pie crust of your choice
2 tsp. olive oil
1 large leek
1 pound shrimp
1/2 pound Gruyere cheese, divided
6 whole eggs
3 cups milk, preferably whole

Mise en Place:
  • pre-heat oven to 375°
  • roll out dough and place in pie plate.  Set prepared pie plate in refrigerator until needed
  • grate cheese and divide leaving a little cheese to top the quiche with
  • clean and chop the leek (while and pale green only)
  • shell, de-vein, and slice shrimp into bite sized pieces
  • crack eggs into bowl; measure salt and grate nutmeg
  • measure milk into heavy sauce pan
Method:
In medium sauté pan, heat oil and saute leeks until just turning soft.  Add the shrimp and constantly stir quickly for 1 minute only.  Remove from heat.

Pull the pie crust out of the refrigerator and spread the majority of the cheese in the bottom of the shell; saving some for the top.

Arrange the leeks and shrimp pieces on top of the cheese.

Crack the eggs in a mixing bowl and whisk until combined and light yellow.  Set aside.

In a 2 quart saucepan, heat the milk over medium heat until almost boiling.  You'll see bubbles all around the sides of the pan.

With a 1/4 cup measuring cup slowly begin to add the hot milk mixture, in a stream, to the egg mixture, whisking as you go.  Do this about two more times.  What you are wanting to accomplish here is warming the egg yolks enough to be able to add them back to the milk mixture without the eggs scrambling.  Once the eggs are tempered slowly add them to the milk mixture whisking constantly until the milk/egg mixture comes to a boil.

Continue to beat the custard mixture until it starts to become thick.  When the mixture coats the back of a spoon it is ready.

Slowly pour the custard into the pie shell.  Place the pie plate on a cookie sheet and bake in the 375° oven for about 30 minutes or until the custard is set and the top is golden.

Serve hot, directly from the pan.

Tuesday, May 21, 2013

Baked Salmon Croquettes


Lovey and I have been long time fans of salmon croquettes (cakes, patties - whatever you grew up calling them).

I used to use canned salmon but I thought it might be fun to try them with fresh salmon.  And am I glad I did!

 
I started with making some poaching liquid of water, white wine, celery leaves, Italian parsley and black peppercorns


Once the poaching liquid comes to a boil it's lowered it to a simmer and the salmon is added. I prefer wild caught salmon. Poaching time is about 12 minutes; possibly shorter if you slice the salmon into smaller filets.


When the salmon has cooled enough to work with it it gets gently shredded; by hand or with a fork


Seasoned dried bread crumbs are tossed with the salmon.  I used crumbs from a stale French baguette.


The mayonnaise mixture is what will give these croquettes a creamy moist inside. I find it easier to use an 8 ounce jar of Hellmann's rather than measuring it out; I tend to use too much mayo if I measure it myself.


It will be evident that this is a wet mixture. I usually put the mixture in the refrigerator for awhile and let it firm up a little.


Just before you put them in the oven, form the croquettes and coat them in Panko crumbs. You can also form the patties and let them rest, on waxed paper, in the refrigerator until you are ready to bake (don't dredge in the Panko crumbs until you are ready to put in oven - the crumbs will get soggy if you do).


The cooking time is about 40 minutes because the croquettes are cold when placed into the oven .  Be sure to watch yours so they don't brown too much.  I found that by the time the exterior was browned to a nice golden color the croquettes were nice and hot in the middle.


Perfectly crunchy on the outside and creamy on the inside.


Baked Salmon Croquettes
Yields 8 croquettes, serving 4
Adapted from Sheila Lukins' "U.S.A. Cookbook"

Ingredients:
For the Poaching Liquid
4 cups water
1 cup dry white wine
4 sprigs celery leaves
6 sprigs fresh flat-leaf parsley
1 tsp Kosher salt
6 black peppercorns
1 pound salmon fillet

For the Croquettes
1/4 cup dried bread crumbs
1/2 tsp dried thyme
1 tsp dried oregano
1/2 tsp dried mustard
1 cup Hellmann's mayonnaise (an 8 ounce jar is easy)
1/2 cup finely diced yellow onion
1/2 cup finely diced celery
1 Tbsp drained tiny capers, coarsely chopped
1 Tbsp chopped fresh flat-leaf parsley
1 tsp Worcestershire sauce
1 egg, lightly beaten
 Salt & freshly ground black pepper, to taste
1 cup Panko crumbs

Method:
Prepare the poaching liquid by combining all the ingredients, except the salmon, in a large saucepan.  Gently rub your fingers along the surface of the salmon filet and remove any bones that may have been left. Bring poaching liquid to a boil then reduce to a simmer. 

Add the salmon to the poaching liquid and simmer until it can be easily flaked with a fork, about 12 minutes.  Using a slotted spoon remove salmon from liquid to a dish and set aside to cool.  When the salmon is cooled enough to handle, remove any skin and bones and flake the fish into  large bowl.  Set aside.

In a small mixing bowl combine the 1/4 cups dried bread crumbs, the thyme, oregano, and mustard. Gently combine this with the cooled, shredded salmon.

Measure 1 cup of Hellmann's mayonnaise in a medium mixing bowl.  Finely dice onion and celery; add to mayonnaise.  Coarsely chop the capers and parsley; add to mayonnaise.  Measure the Worcestershire into the mixture and lastly add the lightly beaten egg.  Mix well.  Combine the bread crumb/salmon mixture with the mayonnaise mixture. Salt and pepper to taste

Place the mixture in the refrigerator to firm up a bit. Using a 1/4 cup scoop you should get around 8 patties. You can make smaller hors d'oeuvres - sized patties as well to serve as appetizers

When ready to bake, preheat oven to 350°.  Pull croquettes mixture out of refrigerator, form patties and gently roll both sides with plain Panko crumbs.  Place on a parchment-lined baking sheet and bake for about 40 minutes until the Panko begins turning  a golden brown.

 NOTES: 
These can easily be prepared to the shaping stage and covered with plastic wrap and cooled overnight, putting Panko on prior to putting in oven. 

A nice side salad of iceberg lettuce and marinated pear tomatoes would round out the meal.


Thursday, April 25, 2013

Yes, You Can Eat Well at the Sea Shore

This past weekend I spent about four and a half days with my bestest friend down in Corpus.  She and her husband have retired there and have re-built his family home into a very nice house that fits them to a tee.  But we didn't stick around her house all the time.

Sunday, PR let us take his four wheel drive Ford King Ranch Edition Crew Cab pick-up out on the Padre Island National Seashore.  That is one nice and B-I-G truck!

If you drive about 10 more miles down the road once you've gotten on the island you reach the gate for the National Seashore.  It's quiet, people are few and far between and if you have the time you can drive 60 miles down the island on the beach; but at 15 miles per hour it would take you about 4 hours.  You pay $10 per car or $20 for an annual pass.  Being the mathematical geniuses Karen and I are we purchased the annual pass for Karen since she can visit every day if she wants to.

We drove the truck down the beach until we found an isolated spot.  We set up camp, so to speak.  We laid a blanket down on the sand, folded out our comfy chairs and set the ice chest in between them as a 'coffee table'.  We also had some really nice roll-out pads with pillows that Karen's friend Brenda bought to use when we wanted to lie down and stretch out; thanks Brenda!  They worked out really nice!

After a nice long walk down the beach, looking for the nesting turtles (of which we found none) we relaxed at our campsite with an adult beverage and a book to read. 

Alas, we did get a bit hungry and this is what we brought to make for our lunch.  A sandwich; but not any old sandwich. 

 
 This sandwhich started with a very nice whole wheat bun sliced in half

The night before we made a batch of pesto with Karen's overflowing basil plant that grows in her potager.  We used that pesto as our base for the sandwich.


Topped that with some sliced avocado and seasoned with a little sea salt


 Laced it with slices of Brie


 Roma tomato with an additional sprinkling of salt


 And topped it off with some Romaine lettuce.


Proof that you can eat well at the beach when you aren't in the mood for hamburgers and hotdogs.