Wednesday, February 27, 2013

Roasted Green Beans

There are many uses for canned green beans but they simply can't compete with fresh.  This has proved to be an easy, quick way to serve them up on a week night.  If you're a working girl like me you can wash and trim the beans the night before.  That will save you even more time.

I can't tell from the clipping what magazine I tore this recipe out of, nor the date.  Who would have known when I started clipping recipes, back in the Stone Age, that I would one day really like to know where and when a recipe came from.


This looks pretty wicked doesn't it?  I think a witch might have a finger that looks like this.  The only criticism Lovey had about this recipe was that the tips on the beans turned into weapons when they got crispy. I had to agree with him.   I usually leave the tips on when I steam beans and it's no problem but these were definitely prickly by the time they roasted!  Be sure and snap them off!  Unless you want to injure a family member.


Simply toss the ingredients, spread out on a jelly roll pan, and bake


In 10 minutes they are ready to eat.


Roasted Green Beans
Yields 4 servings

Ingredients:
1-1/4 pounds green or wax beans, trimmed
2 Tbsp. slivered almonds
1 Tbsp. fresh squeezed lemon juice
2 tsp. olive oil
1/2 tsp. Kosher salt
1/4 tsp. garlic powder
1/4 tsp. dried basil
1/4 tsp. freshly ground black pepper

Mise en place:
  • wash and trim both ends of the beans.  Allow to dry on a towel then throw them into a mixing bowl
  • preheat oven to 450°F.
Method:
Measure all of the remaining ingredients into the bowl with the beans and toss well with your fingers.  When coated, transfer the beans to a jelly roll pan and bake for 10 minutes or until beans are tender and browned, stirring occasionally.


Tuesday, February 26, 2013

Brown Mushroom Steak Sauce


I have no idea where this recipe came from.  I can only deduce that I saw it on the telly because it's in my hand writing, scribbled down on a piece of paper.  I'm sorry I'm not able to give credit where credit is due.

The night I had this dish scheduled for dinner was on a night I was to play Bunko.  On top of it being Bunko night the train rolled into the station late, then the traffic sucked which put me at home with only 30 minutes to get dinner ready and get myself down the street for game night with the neighborhood gals.

I can attest to the fact that you can make this in a hurry.  Actually, it helped that I had cleaned and sliced the mushrooms the night before.  Being in such a hurry didn't allow enough time to take many photos. 


I used this sauce of mushrooms, garlic, vermouth and balsamic vinegar as the cooking medium for 4 - 6 ounce cod fillets.  The only thing I wasn't crazy about was that the fish itself took on a brownish gray color after cooking in the deep brown sauce.  Otherwise tasted great.

With quite a bit of sauce and mushrooms left over, I used it the next night to top off a marinated flank steak that I broiled.

So, although the original recipe was intended for a piece of cod I think it paired much nicer with beef.  In light of that, this will dwell in my file of sauces; a mushroom sauce; a good mushroom sauce for dressing up an inexpensive cut of meat like a flank steak or cube steaks. 

Brown Mushroom Steak Sauce
Yields approximately 1/4 cup

Ingredients:
4 Tbsp. cold unsalted butter, divided
10 ounces crimini mushrooms
4 medium cloves garlic
1/2 cup dry vermouth
3 Tbsp chopped fresh parsley
1 Tbsp. balsamic vinegar
1/2 tsp. kosher salt
1/4 tsp freshly ground black pepper

Mise en place:
  • measure out butter dividing into a 3 Tbsp. piece and a 1 Tbsp. piece
  • clean mushrooms by wiping with a paper towel or quickly rinsing under cold water; slice mushrooms 1/8" thick
  • peel and mince cloves of garlic
  • chop parsley
  • measure out vermouth, vinegar, salt and pepper
Method:
In a 12-inch skillet melt 3 Tbsp. of the butter over medium-high heat.  Add mushrooms and cook, stirring occasionally until well browned, 5 - 7 minutes.  Add garlic and cook until golden and fragrant, about 45 seconds.  Add vermouth, parsley, vinegar, salt and pepper and boil until liquid is reduced by half (about 2 minutes).

Reduce heat to low and gently simmer for about 5 minutes.  Over the low heat, whisk the remaining 1 Tbsp. of butter into the sauce.  Spoon over steak.

Monday, February 11, 2013

Baguette Parisienne


Isn't is amazing how 4 simple ingredients, when combined, produce one of life's greatest pleasures?  What would that be, you ask?  Mais bien sûr, it is the Baguette ordinaire or the Baguette parisienne!


Flour, water, salt and yeast.  That's all.  That's the law.  The shortening is to rub on the baking pans I use.  It's not part of the bread itself.


In a heavy duty stand mixer with the paddle, or flat beater, stir the salt, warm water and yeast together until combined then add 3 cups of the flour.  Try to stay within the range of 105° to 120° with your warm water; get it too hot (like 130° to 140°) and it will kill the yeast.  You will be committing murder of a living organism.


Cup by cup, add 3 more cups of the flour and keep incorporating it.  You will have a big gloppy mess but that's OK.  You'll take care of that in the next step.  One thing to watch, especially if you have a KitchenAid, is to avoid letting the dough ride up the paddle/flat beater all the way to the beater shaft.  It's a mess to clean up.  Please don't ask me how I know this to be true.


Throw some flour on your work space, throw the dough down and sprinkle some flour on top of the dough as well as your hands.  Begin to knead and work in the flour.  You will probably work in another full cup of flour.


To knead the dough, push the dough out front, away from you with the heel of your hands, fingers spread out (like you're 'high-fiving' someone).  Slip your right hand under the far right edge of the dough and fold it back on itself to the left.

At the same time you are folding turn the dough a quarter turn to the left. Begin kneading again pushing away from you then folding the right side over the left while turning. Keep doing this and sprinkle flour whenever the dough becomes sticky and dough sticks to your hands.


Eventually you will have a smooth, pliable mound of dough that is silky.  This may take ten minutes.  To break up your push-fold-turn routine of kneading, pick up the ball of dough and throw it hard against the work surface.  Then start kneading again.  Believe me, the dough loves this and you can get rid of all sorts of frustrations by doing this.  This is one reason I love making bread and kneading by hand; it's therapeutic.

Another reason is that I like to be able to tell by touch that the dough is ready. One way to judge is to press the palm of your hand on top of the dough.  If dough doesn't stick to the surface of your palm, it's good to go.   There is nothing wrong with kneading in your mixer using the dough hook.  I do this when I'm not in the mood to knead and allowing your dough hook to do all the work produces a fine product too.


Rub some Crisco around the inside of a large bowl.  Roll the ball of dough around to lightly coat all sides.  Cover with a damp tea towel and set in a warm (ideally, 85° to 90°F) draft-free area and let the dough double in size.  The 1st rising time will be around 2 hours.  Since Lovey and I like to keep the house fairly cool during the winter, I put my bowl in the oven (no heat turned on).  Don't worry if you don't have a warm place to let the dough rise; it will just take longer to double.

While the dough is rising, grease your pans if necessary.  My pans are dimpled and the manufacturer instructions suggested they be greased.  I use Crisco shortening.  Get your fingers in there and rub it lightly over the interior of your pans.


When the dough has doubled punch it down right in the bowl.


Fold it over a couple of times.


Dump the mound of dough out onto a work surface to begin the shaping process; don't use any more flour from this point.  With a knife or a pastry scraper divide the dough into 4 equal pieces, because this recipe will make 4 baguettes.  I know, the math is quite advanced.  Please stay with me.


Mine weighed out to around 12.5 ounces each.  Allow your pieces of dough to rest for about 5 minutes.


Working with one piece at a time, squeeze it while shaping it into a piece of rope.  Lay it down on your work surface and roll it back and forth between your outstretched palms, working the thick spots towards the thinner spots until your whole loaf is more or less uniform in diameter and about one inch shorter than the pan on both ends


Scoring the bread.  This little tool is referred to as a lame (pronounced “lahm.”)  It's simply a French word that means “blade.”  You don't have to have one of these tools.  You can use any razor blade or very sharp knife.  Sometimes I use a serrated knife.


My slashes aren't the prettiest today and they could have been angled a little more towards the length of the baguette.  Oh well, who cares?  Just don't slash them directly across the width of the baguette.


These are the loaves after they have risen in their pan.  Be sure to let them rise enough so they fill the pans and the tops are well above the edge of the pan.


Allow the loaves to cool with air circulating around them.


The more holes in the texture, or crumb, of your bread the better.  I'm sure it's recorded in the annals of French law that upon removal from the oven, you immediately tear off a piece of your hot bread and slather it with sweet cream butter.  All those holes in your crumb are made to be filled up with butter.


A fresh baguette can go stale within 2 to 3 hours so you will want to freeze what you don't eat.  I halve the leftover loaves because they fit in my freezer easier this way.  Wrap securely in foil and freeze.  When you are ready to eat the frozen loaves, heat the wrapped loaves in a 350°F oven for 15-20 minutes or when the bread is soft when you squeeze it.  Unwrap it when you take it out of the oven so it can cool similarly to how you cooled the loaves when you first baked them.

You can also give a loaf or two to a neighbor. You will be their new best friend.

Baguette Parisienne
Produces 4 loaves around 22" long

Ingredients:
1 Tbsp salt
2-1/2 cups warm water (100° - 120°)
1 - .25 oz. packet (or approx. 2-1/2 tsp) instant yeast
7 cups all purpose flour, divided

Method:
In a heavy duty stand mixer with the paddle, or flat beater, mix the salt, warm water and yeast.  Try to stay within the range of 105° to 120° with your warm water; get it too hot (like 130° to 140°) and it will kill the yeast.  Stir until combined then add 3 cups of the flour.

Cup by cup add around 3 cups more flour.  By now your dough should be a big sticky glob; but that's the way you want it.

Measure out 1 cup of flour into a pile to the side of your work space.  Sprinkle some flour in the area you will be kneading the dough and turn the dough out onto the work surface.  Sprinkle a little flour on top fo the dough and on your hands.

Knead your dough, adding flour as you go.  You will probably use the cup of mounded flour you measured on the side.  As you knead (could be as long as 10 minutes) the dough will start to feel more like dough than a sticky blob.  Then it will take on a different feel; more elastic.

Rub some shortening or vegetable oil around the inside of a large mixing bowl.  Roll the dough around 2 or 3 times to coat with the shortening.  This will keep the surface of the dough from crusting over.  Cover the bowl with a damp tea towel (squeezed out very well) and place in a warm, non-drafty place to rise.

While the dough is rising, lightly grease your pans with shortening.  I use Crisco.

Once the dough has doubled in size, punch down several times then turn out on the work surface (no more flour from this point).  Knead a couple of times then divide the dough into 4 equal pieces (weighing is a good idea).  Form in rounds and allow to rest for 5 minutes.

To loave, work with one piece of dough at a time and work it with your hands until it's shaped like a piece of rope.  Lay it down on your work surface and with outstretched palms roll the dough back and forth working the thick spots into the thinner until you have a somewhat uniform shape in diameter and that is one inch shorter than the pan on each end.  Lay it in the greased pan.  Repeat with the remaining 3 pieces of dough.

A note here on handling the dough.  Don't be timid about manhandling the dough.  The rougher you are with it the more tender your bread will be.

Take a lame, very sharp knife or a razor blade and make 4 to 5 slashes on each loaf.  Your slashes should be long and diagonal and 1/8 to 3/8 inches deep.

Set the pans back in the warm place for the loaves' final rising.  All the loaves to rise until they fill the pans and the center stands well above the edge.

Preheat the oven to 450°F.  Bake the loaves for 15 minutes then turn the oven down to 350°F. and continue baking for another 30 minutes.

Remove the loaves from the oven and pop them out of the pans.  Lay the loaves across the pans or on a cooling rack and allow them to cool with air circulating around them.

Bread not eaten will go stale in 2 to 3 hours.  Wrap the loaves tightly in aluminum foil and freeze.  To refresh, heat up the wrapped loaves in a 350°F oven for about 20 minutes, or until they are soft to oyour squeeze.  Unwrap and let it cool with good circulation.

Saturday, January 26, 2013

Winter Squash and Gruyere Gratin

The ingredients that made me look twice at this recipe were the butternut squash, the leek, white wine, and the Gruyere.  Surely those four ingredients could produce something tasty.


The squash gets baked


the leek gets steamed


and the wine becomes the beginning of a creamy sauce


You are given the option of using evaporated skim milk (which is what I used) or whole milk.  I wasn't impressed with the evaporated milk.  I suggest you use whole or 2% milk.


Instead of the bread crumb/cheese mixture typical for a gratin, this recipe called for toasted slices of a baguette.


All of the ingredients waiting to be layered.  I could tell there was no way these ingredients were going to fit in the shallow traditional au gratin dish so I used an 8 cup casserole.


Start with half of the squash


Half the sauce


Half the toasted baguette slices


then the Gruyere


Repeat the layers, top with the Parmesan and bake.


Winter Squash and Gruyere Gratin
Adapted from Food and Wine October 1988
Serves 4 to 6

Ingredients:
2 medium butternut squash (1-1/2 pounds each)
3/4 tsp salt, divided
3/4 tsp freshly ground pepper, divided
1 medium leek
1 tsp olive oil
2 tsp water
1/2 cup dry white wine
1/2 cup low-sodium chicken stock
1 cup whole or 2% milk
1/2 tsp sugar
8 - 10 thin slices of a baguette
4 ounces Gruyere cheese
2 Tbsp Parmesan cheese
8 basil leaves, shredded (optional)

Mise en place
  • Slice squash in half lengthwise; remove seeds
  • clean leek and chop the white part only
  • measure olive oil into a medium saucepan
  • slice baguette and toast in oven until brown on both sides
  • measure seasonings, wine, chicken stock, milk, and sugar
  • grate cheeses
Method:
Pre-heat oven to 400°F.  Place halves, cut side up, in a baking dish.  Season with 1/2 tsp each of the salt and pepper and cover tightly with foil.  Bake until the squash are tender but not mushy, about 1 hour.  Set aside to cool slightly.  With a large spoon, scoop meat of the squash in pieces into a bowl and set aside.

While squash are baking, combine the leek, olive oil and 2 tsp water in a medium saucepan.  Cover and cook over moderately low heat until the leek is soft and translucent, about 5 minutes.  Remove the lid and stir in the wine.  Increase the heat to high and boil until the liquid is reduced to approximately 3 Tbsp, about 3 minutes.  Stir in the stock, milk, sugar and remaining 1/4 tsp each salt and pepper.  Remove from the heat.

To assemble the gratin, preheat the oven to 400°F.  Re-heat the leek mixture until hot but not so hot that the mixture separates.  Spoon half of the squash into a 6 to 8 cup ovenproof casserole.  Ladle half of the leek mixture over the top and cover with half of the toasted baguettes and half of the Gruyere.  Repeat the layers with the remaining squash, leek mixture, baguettes and Gruyere.  Sprinkle the Parmesan cheese over the top.

Bake the gratin for 30 minutes, or until the top is browned and bubbly.  Garnish with the basil and serve (optional)


Sunday, January 13, 2013

Garam Masala

An aromatic spice blend used in many Indian dishes, it's said that there are as many recipes for Garam Masala as there are dishes that it goes in.
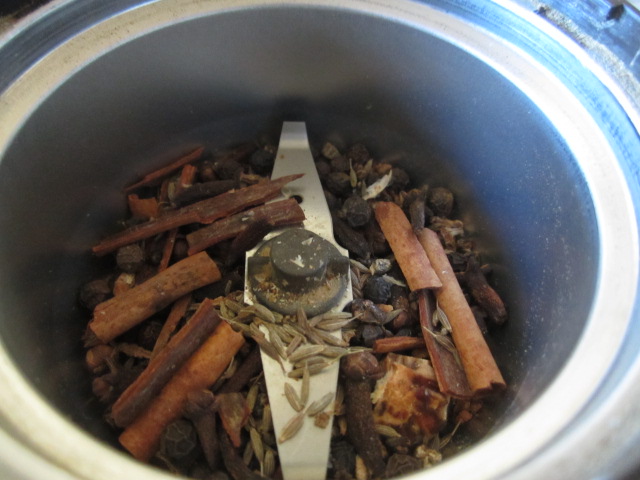
It's pot luck week at I Heart Cooking Clubs and I'm taking an easy path by preparing a small batch of this popular spice blend.


This simple recipe is by Madhur Jaffrey.  Her recipe makes about 3 Tablespoons, which is a nice small amount to keep on hand.  Its name translates literally as "warm spice mix."


I didn't have cardamom seeds on hand so I had to crack the pods I had in the spice drawer.  If you can't buy the seeds then buy cardamom pods and shell them yourself.  A bit tedious but by fingers smelled great afterwards.


I keep a small coffee grinder dedicated for spices alone.


Garam Masala
A recipe by Madhur Jaffrey
Yields approximately 3 Tbsp.

Ingredients:
1 Tbsp cardamom seeds
1 tsp black peppercorns
1 tsp black cumin seeds (you can use regular cumin seeds if black aren't available)
1 tsp whole cloves
1/3 of a whole nutmeg (you can break a whole nutmeg by placing it on a cloth and bashing it with a meat mallet or rolling pin)
a medium sick of cinnamon, about 2 - 3 inches, broken up into 3/4 pieces.

Method:
Put all the ingredients in a clean coffee grinder or other spice grinder and grind as finely as possible.

Store in a tightly lidded jar, away from heat and sunlight and use as needed.


I'm sharing this recipe at IHCC

Tuesday, January 1, 2013

Black-Eyed Peas and Ham

Happy New Year !!!!!  I wish for all of you a prosperous and blessed year to come! 

New Year's day in our household always means black-eyed peas and ham to bring luck through the upcoming year.  Here is my basic, go-to recipe.


I start with dried black-eyed peas, cover with water and soak them overnight.


In a large Dutch oven fry two to three slices of thick bacon that have been diced.  I find that bacon is much easier to chop or dice if it has been placed in the freezer for awhile.  Fry until crisp and remove the bacon from the pot and drain on paper towels.  You can add the bacon back to the pot later but I usually snack on them and eat them all.


 Sauté chopped onion and garlic for a couple of minutes.


 Add water, black-eyed peas (that have been drained and rinsed), the bay leaf and ham hock.


Bring to a boil then turn down heat to a simmer.  After about 20 minutes add the cubed ham.  Continue simmering until beans are tender.  Remove ham hock, allow to cool, remove meat from bone and add back to beans.


Black-eyed Peas and Ham
 Yields 6-8 Servings

Ingredients:
1 package (one pound) dried black-eyed peas
2-3 slices thick smoked bacon
1 yellow onion
1 clove garlic
8 cups water divided
smoked ham hock
1 bay leaf
1/2" thick slice of ham (approx. 3/4 lb)
2 cubes Knorr beef bouillon

Mise en place:
  • place beans in a large mixing bowl and cover with water and soak 4 hours or overnight
  • chop bacon
  • chop onion
  • mince garlic
  • cube ham
Method:
In a large Dutch oven fry bacon pieces until crisp.  Remove bacon bits to drain on paper towel.  Remove all but 2 Tbsp. of the bacon fat.  Sauté onion and garlic in bacon fat for several minutes.  Add 1 cup water and bring to brisk boil.  Boil for a minute or two and scrape up fond from the bacon.  Add rest of the water. 

Drain and rinse black-eyed peas and add to pot.  Add ham hock and bay leaf.  Bring to boil, scraping off any foam that may appear.  Lower heat and simmer.  After 20 minutes add cubed ham and bouillon cubes.  Continue simmering until beans are tender but not mushy; about 20 minutes more.

Remove bay leaf and ham hock.  Remove meat from hock and return to pot.  Serve with corn bread.

Monday, December 31, 2012

Clear Toy Candy

I love going to estate sales.  I head straight for the kitchen to see what treasures I can find. 


At a recent sale I was so excited when these were discovered on a table in a little room off the kitchen.

These are small cast iron molds of Christmas shapes.  I adore cast iron.  I don't know why; maybe the heaviness of it, the feel of it, I don't know....I just love it.


This one has a snowflake, a stocking, a star and a gingerbread man


This mold has a drummer boy, a trumpet (my favorite), a gingerbread house, and a dancing bear.

When I was in high school mom taught me how to make suckers by boiling sugar and water to the hard candy stage. We simply laid a lollipop stick on a buttered cookie sheet and poured a little round circle of the sugar mixture over the stick.  So, these brought back Christmas memories; only these are fancier and 3 dimensional.

The molds came with a flyer telling the History of these candies.  It states that in Christmases past children would set out a dinner plate before going to bed.  When they woke up the next morning they would find the plates filled with fruit, nuts and molded hard candy they called "clear toys".

The John Wright Company has reproduced the antique molds, modernizing them with a non-stick surface.  Information on the box of the set I found indicates this set was made exclusively for Williams-Sonoma around the mid-nineties.


The molds are held together with a short, heavy-duty rubber band.


Being a little skeptical about leaks, I set them on an old jelly roll pan.


Over medium heat you will heat the sugar, cream of tarter, water mixture until the sugar is completely dissolved.


Then you'll let it boil until it reaches the hard crack stage at 300°F.


After bringing the candy mixture to right temperature you carefully pour the liquid into each mold.  Insert the lollipop sticks; this kit came with 4-1/2" sticks

Let the candy cool.  The instruction leaflet said that cooling would take 4 to 8 minutes.


Hmmm.....don't think so.  I found that you need to go by the feel of the mold (temperature) and test every once in a while to gently pry them apart to see if they are going to come apart easily and release the candies from one side of the mold.  I used a screw driver tip to slip in between the molds.


I began with the 8 minutes to cool then tried every 5 minutes to check the ease of the molds separating.


Lift out of the molds by gently grabbing the lollipop stick right at the base of the candies and pulling up.  This is a snowflake.


I added a couple drops of green food coloring and natural peppermint flavoring right after pulling the pan off the stove, prior to pouring the candy in the molds.

You can still enjoy this clear candy, even if you don't have 3 dimensional molds.  Simply butter 2 large baking sheets.  Quickly drop liquid from a large spoon onto the baking sheets making the drops round.  Press a lollipop stick into the edge of each lollipop before it hardens.
 
Clear Toy Candy
Yields 8 individual clear toys

Ingredients:
1-1/4 cups granulated sugar
Heaping 1/4 tsp. Cream of Tartar
3 ounces water
Optional:  1 tsp. of natural flavoring and/or food coloring
8 (4-1/2") lollipop sticks

Mise en place:
  • assemble molds and stand upright on baking sheet with sides
  • have lollipop sticks ready to insert
  • if using flavoring and/or coloring, have those standing by
  • measure sugar, cream of tartar and water into a heavy saucepan
  • have a candy thermometer ready to attach to side of saucepan
Method:
Heat the sugar, cream of tartar and water mixture over medium heat, stirring constantly, until sugar is completely dissolved.  Cover and let cook 2 - 3 minutes to dissolve the sugar crystals on the sides of the pan.  Remove the lid.  Cook without stirring until temperature reads 300°F on a candy thermometer.  Total cooking time is approximately 25 minutes.  Add a few drops of coloring and the flavoring quickly after removing from heat.

Pour the syrup into molds slowly.  Fill each mold halfway on first pass and do a second pass, filling to the top.  If you fill too quickly the mold will overflow.

Insert lollipop sticks immediately and let cool.  After approximately 8 minutes start testing the molds to see if they will separate completely from the other half of the mold.  If sticks lean after insertion, straighten as liquid hardens.  Denser shapes take a little longer to harden. If you have difficulty in separating the molds, use a knife point or a flat screw driver to gently pry open.

Once molds are cooled and the two halves of mold separate cleanly remove candy from mold by slowly lifting the stick.  If you remove the candy before it has cooled, shape may droop.  If you wait too long candy may break.  Wrap each candy toy in a lollipop wrapper and store in a cool, dry place.